테라폼이란?
- 테라폼Terraform은 하시코프Hashicorp에서 오픈소스로 개발중인 클라우드 인프라스트럭처 자동화를 지향하는 코드로서의 인프라스트럭처Infrastructure as Code, IaC 도구입니다.
- 테라폼음은 대상 인프라와 서비스를 테라폼으로 작업하기 위해서는 대상의 제공자, 프로바이더가 둘 사이에서 인터페이싱해야 하며, 각 인프라와 서비스는 고유의 api를 가지고 있고 프로바이더는 각 API 명세를 테라폼 코드로 호출해 동작 합니다.
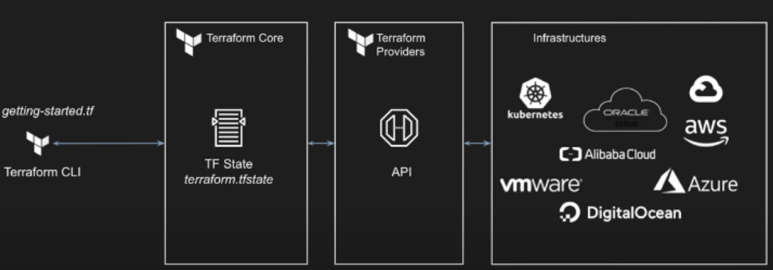
Provisioner -Provisioner는 Terraform으로 리소스를 생성하거나 제거할 때 로컬이나 원격에서 스크립트를 실행할 수 있는 기능으로 0.8부터 추가되었다
Provider -특정 벤더에 대해 접근할 수 있도록 도와주는 역할을 한다. -리소스에 대한 간단한 CRUD API 호출을 담당한다. -인프라 제공자를 통한 인증을 한다.
실습 환경 설정
*테라폼 버전은 1.5.2 입니다.
*사용하는 툴은 비주얼 스튜디오 코드 입니다.
- 테라폼으로 시작하는 IaC 책을 기준으로 작성하였습니다.
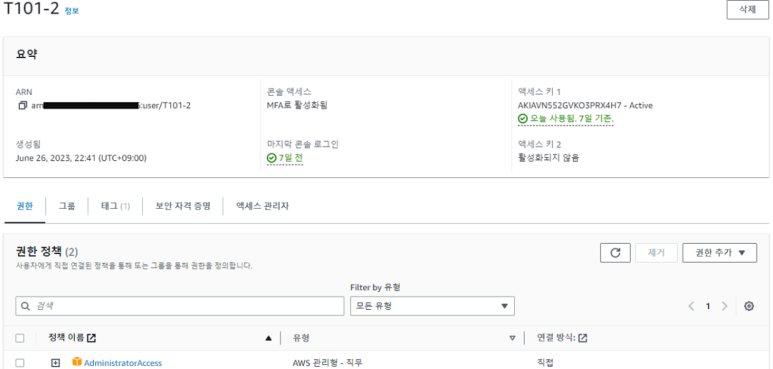
- AWS 콘솔에서 IAM을 통하여 권한을 생성을 해주며 해당 USER에게 AdministratorAccess 권한을 부여합니다. (아래에서 추가설명 합니다.)
2. 자신의 OS의 맞는 환경에 맞춰 테라폼을 설치하여 줍니다. (여기선 윈도우 환경이므로 윈도우만 설명합니다)
- 윈도우에 WSL2 설치
- WSL2 실행(Shell 접속)
- 테라폼 설치 및 확인 – 링크 (Linux → Ubuntu/Debian 선택)
wget -O- https://apt.releases.hashicorp.com/gpg | sudo gpg --dearmor -o /usr/share/keyrings/hashicorp-archive-keyring.gpg
echo "deb [signed-by=/usr/share/keyrings/hashicorp-archive-keyring.gpg] https://apt.releases.hashicorp.com $(lsb_release -cs) main" | sudo tee /etc/apt/sources.list.d/hashicorp.list
sudo apt update && sudo apt install terraform

# 테라폼 버전 정보 확인
terraform version
IDE 구성
비주얼 스튜디오 코드에서 아래와 같은 통합 개발 환경을 설치하여 줍니다.
- Extentions (확장) 설치
- HashiCorp HCL : syntax highlighting for HCL files – 링크
- HashiCorp Terraform : Highlighting syntax from Terraform 등 – 링크

AWS CLI 설치 및 자격증명
# Linux 설치 방법
curl "https://awscli.amazonaws.com/awscli-exe-linux-x86_64.zip" -o "awscliv2.zip"
unzip awscliv2.zip
sudo ./aws/install


# aws cli 버전 확인
aws --version
aws-cli/2.7.31 Python/3.10.7 Darwin/21.6.0 source/x86_64 prompt/off

# aws cli 사용 시도
aws s3 ls

---
# aws configure 로 자격증명 설정 : 방안1
aws configure
... >> 입력

aws configure list
Name                    Value             Type    Location
      ----                    -----             ----    --------
   profile                <not set>             None    None
access_key     ****************X4H7 shared-credentials-file
secret_key     ****************jnZu shared-credentials-file
    region           ap-northeast-2      config-file    ~/.aws/config
EC2 배포
- provider : Terraform으로 정의할 Infrastructure Provider를 의미
- resource : 실제로 생성할 인프라 자원을 의미
터미널 1에서 파일생성 합니다.
cat <<EOT > main.tf
provider "aws" {
  region = "ap-northeast-2"
}

resource "aws_instance" "example" {
  ami           = "ami-0a0064415cdedc552"
  instance_type = "t2.micro"
}
EOT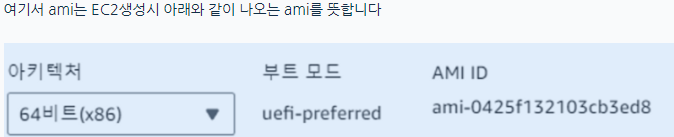
resource “<PROVIDER>_<TYPE>” “<NAME>” { [CONFIG …] }
PROVIDER : ‘aws’ 같은 공급자의 이름
TYPE : ‘security_group’ 같은 리소스의 유형
NAME : 리소스의 이름
CONFIG : 한개 이상 arguments
배포 실행 : 터미널2에서 실행 합니다.
# 초기화
terraform init
ls -al
tree .terraform

# plan 확인
# 배포되기전 확인이 가능합니다.
terraform plan
위 그림과 같이 EC2 1대가 생성 된것이 확인 가능 합니다.
하지만 위 그림을 보면 태그가 없는것을 알수가 있습니다.
코드를 수정해 봅니다.
cat <<EOT > main.tf
provider "aws" {
  region = "ap-northeast-2"
}

resource "aws_instance" "example" {
  ami           = "ami-0a0064415cdedc552"
  instance_type = "t2.micro"

  tags = {
    Name = "minho-study"
  }

}
EOT
# plan 실행 시 아래와 같은 정보가 출력
terraform plan
# aws_instance.example will be updated in-place
~ resource "aws_instance" "example" {
id = "ami-0a0064415cdedc552"
~ tags = {
+ "Name" = "minho-study"
}
~ tags_all = {
+ "Name" = "minho-study"
}
# (29 unchanged attributes hidden)
# (7 unchanged blocks hidden)
}
# apply 실행
terraform apply
 Enter a value: yes 입력
위와 같이 Name 이 변경된것이 확인 가능 합니다.
확인을 하였으니 삭제를 해봅시다
# 리소스 삭제
terraform destroy
 Enter a value: yes 입력

혹은
#yes 생략합니다.
terraform destroy -auto-approve
EC2 1대 배포 & 웹 서버 설정
cat <<EOT > main.tf
provider "aws" {
  region = "ap-northeast-2"
}
# aws 환경에 배포하고 리전은 서울이다.
resource "aws_instance" "example" {
  ami                    = "ami-0c9c942bd7bf113a2"
  instance_type          = "t2.micro"
  vpc_security_group_ids = [aws_security_group.instance.id]

#유저데이타 ec2 최초 프로비저닝시 실행할 명령어
  user_data = <<-EOF
              #!/bin/bash
              echo "Hello, T101 Study 9090" > index.html
              nohup busybox httpd -f -p 9090 &
              EOF

#유저데이타 변경되면 기존꺼 날리고 새롭게 생성한다
  user_data_replace_on_change = true

  tags = {
    Name = "Single-WebSrv"
  }
}

resource "aws_security_group" "instance" {
  name = var.security_group_name

  ingress {
    from_port   = 9090
    to_port     = 9090
    protocol    = "tcp"
    cidr_blocks = ["0.0.0.0/0"]
  }
}

variable "security_group_name" {
  description = "The name of the security group"
  type        = string
  default     = "terraform-example-instance"
}

output "public_ip" {
  value       = aws_instance.example.public_ip
  description = "The public IP of the Instance"
}
EOT
배포실행
# 모니터링
while true; do aws ec2 describe-instances --query "Reservations[*].Instances[*].{PublicIPAdd:PublicIpAddress,InstanceName:Tags[?Key=='Name']|[0].Value,Status:State.Name}" --filters Name=instance-state-name,Values=running --output text ; echo "------------------------------" ; sleep 1; done

# plan
terraform plan
# aws_instance.example must be replaced
-/+ resource "aws_instance" "example" {
...
      ~ user_data                            = "d91ca31904077f0b641b5dd5a783401396ffbf3f" -> "f1a1c16060740d7be18475c067c120a0eed366da"
        # forces replacement
...
Changes to Outputs:
  ~ public_ip = "43.201.8.225" -> (known after apply)

# apply
terraform apply -auto-approve

# 웹 서버 접속 시도 : 터미널3에서 실행
# process 올라오는데 시간이 1~2분 정도 소요되어서, ec2 생성되면 1~2분 정도 후에 curl 접속이 가능하다
PIP=<각자 자신의 EC2 IP>
while true; do curl --connect-timeout 1  http://$PIP:9090/ ; echo "------------------------------"; date; sleep 1; done
#IP조회
terraform output
#퍼블릭 IP만 출력
terraform output public_ip
# "" 음표 날라가고 IP만 남음
terraform output -raw public_ip
#IP변수로 넣음
PIP=$(terraform output -raw public_ip)
#IP넣음
echo $PIP
#조회
curl $PIP:9090
확인이 완료 되었으면 삭제 합니다
# 리소스 삭제
terraform destroy -auto-approve
테라폼 블록
– 테라폼 블록은 테라폼 구성을 명시하는 데 사용 하며 이를 통하여 몇년 후에도 동일한 결과를 얻을 수 있도록 도와줍니다.
– 테라폼 버전이나 프로바이더 버전과 같은 값들은 자동으로 설정되지만, 함께 작업할 때는 버전을 명시적으로 선언하고 필요한 조건을 입력하여 실행 오류를 최소화 할 것을 권장하고 있습니다.
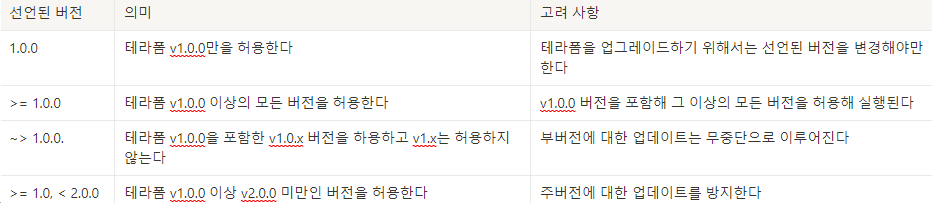
테라폼 버전
테라폼 버전이 다르면 어떤 결과를 불러오는지 봐봅시다.
# 현재 버전 정보 확인
terraform version
Terraform v1.5.2
코드 파일 수정 main.tf
vi main.tf
==
terraform {
  required_version = "< 1.0.0"
}

resource "local_file" "abc" {
  content  = "abc!"
  filename = "${path.module}/abc.txt"
}
==
init 실행
terraform init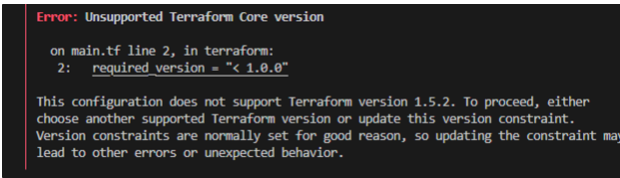
ㄴ정상 작동이 안되는 것을 알수가 있습니다.
코드 파일 수정
terraform {
  required_version = ">= 1.0.0"
}

resource "local_file" "abc" {
  content  = "abc!"
  filename = "${path.module}/abc.txt"
}
init 실행
terraform init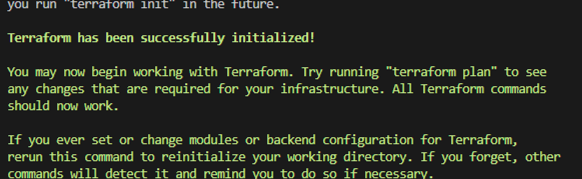
리소스
리소스 구성 resource
- 리소스 블록은 resource로 시작한다. 이후 리소스 블록이 생성할 ‘리소스 유형’을 정의합니다.
- 리소스 선언 : 리소스 유형(프로바이더이름_제공리소스유형), 동일한 유형에 대한 식별자 역할로 고유한 이름, 구성 인수들이 이름 뒤에 중괄호 내에 선언됩니다.
resource "<리소스 유형>" "<테라폼이 구분하는 이름(중복되면 안됨)>" {
  <인수> = <값>
}

resource "local_file" "abc" {
  content  = "123"
  filename = "${path.module}/abc.txt"
}

위와 같이 작성후  terraform init  명령어를 실행할 경우 local_file 작동하기위한 라이브러리를
자동적으로 설치하여 줍니다.
종속성
– 테라폼 종속성은 resource, module 선언으로 프로비저인되는 각 요소의 생성 순서를 구분짓습니다.
[해당실습을 위하여 VS Code 확장 graphviz 설치가 필요합니다.]
resource "local_file" "abc" {
  content  = "123!"
  filename = "${path.module}/abc.txt"
}

resource "local_file" "def" {
  content  = "456!"
  filename = "${path.module}/def.txt"
}

#
terraform apply -auto-approve
...
Plan: 2 to add, 0 to change, 0 to destroy.
local_file.def: Creating...
local_file.abc: Creating...
local_file.abc: Creation complete after 0s [id=5f30576af23a25b7f44fa7f5fdf70325ee389155]
local_file.def: Creation complete after 0s [id=b9fbde4d33ab9c450a7ce303fb4788c9d2db9aed]

# 리소스 확인
ls *.txt
terraform state list
local_file.abc
local_file.def

# graph 확인 > graph-1.dot 파일 선택 후 오른쪽 상단 DOT 클릭
terraform graph
terraform graph > graph-1.dot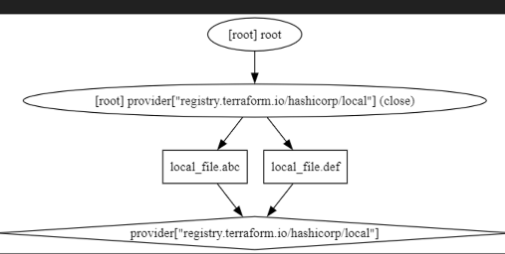
# 모든 리소스 제거
terraform destroy -auto-approve
ls *.txt
terraform state list
리소스 참조값을 설정해 두 개의 리소스 간 암시적 종속성 부여
resource "local_file" "abc" {
  content  = "123!"
  filename = "${path.module}/abc.txt"
}

resource "local_file" "def" {
                            # 123!을 참조한다
  content  = local_file.abc.content
  filename = "${path.module}/def.txt"
}
apply : 커맨드 생성에 순서가 발생한 종속성 있는 두 개의 리소스
#
terraform apply -auto-approve
...
Plan: 2 to add, 0 to change, 0 to destroy.
local_file.abc: Creating... <- 먼저 만들고
local_file.abc: Creation complete after 0s [id=5f30576af23a25b7f44fa7f5fdf70325ee389155]
local_file.def: Creating... <- 그 다음 만듬
local_file.def: Creation complete after 0s [id=5f30576af23a25b7f44fa7f5fdf70325ee389155]

ls *.txt
terraform state list
cat abc.txt
cat def.txt
diff abc.txt def.txt

# graph 확인 > graph-2.dot 파일 선택 후 오른쪽 상단 DOT 클릭
terraform graph
terraform graph > graph-2.dot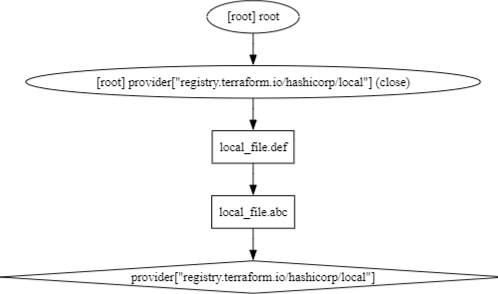
위와 같은 방법이 아니라 depends_on 도 가능합니다.
-AWS 클라우드포메이션에서 사용하는 방법입니다.
resource "local_file" "abc" {
  content  = "123!"
  filename = "${path.module}/abc.txt"
}

#depends_on => 위에꺼 만들고 아래꺼를 만들어라
resource "local_file" "def" {
  depends_on = [
    local_file.abc
  ]

  content  = "456!"
  filename = "${path.module}/def.txt"
}