CloudNet@ 가시다님이 진행하는 Terraform 101 Study 2기 “테라폼으로 시작하는 IaC” (한빛미디어) 도서로 진행!
데이터소스
데이터 소스는 테라폼으로 정의되지 않은 외부 리소스 또는 저장된 정보를 테라폼 내에서 참조할 때 사용합니다.
#루트 모듈 위하여 디렉토리 만든다.
mkdir 3.5 && cd 3.5
데이터 소스 블록은 data로 시작, 이후 ‘데이터 소스 유형’을 정의합니다. (아래 코드는 예시)
data "local_file" "abc" {
  filename = "${path.module}/abc.txt"
}
데이터 소스를 정의할 때 사용 가능한 메타인수는 다음과 같습니다.
- depends_on : 종속성을 선언하며, 선언된 구성요소와의 생성 시점에 대해 정의
- count : 선언된 개수에 따라 여러 리소스를 생성
- for_each : map 또는 set 타입의 데이터 배열의 값을 기준으로 여러 리소스를 생성
- lifecycle : 리소스의 수명주기 관리
실습
# 실습 확인을 위해서 abc.txt 파일 생성
echo "t101 study - 2week" > abc.txt

#
terraform init && terraform plan && terraform apply -auto-approve
terraform state list
==
#데이타블록 / 로컬 프로바이더 / 파일명 출력확됨
data.local_file.abc
==

# 테라폼 콘솔 : 데이터 소스 참조 확인
terraform console
>
data.local_file.abc
...
data.local_file.abc.filename
==
"./abc.txt"
==

data.local_file.abc.content

data.local_file.abc.id
=
"75a47c30031f5fa02f6c4b5170e9539324f95c87"
=

exit
데이터 소스 속성 참조
데이터 소스로 읽은 대상을 참조하는 방식은 리소스와 구별되게 data가 앞에 붙는다. 속성 값은 아래의 코드와 같이 확인 가능 합니다.
# Terraform Code
data "<리소스 유형>" "<이름>" {
  <인수> = <값>
}

# 데이터 소스 참조
data.<리소스 유형>.<이름>.<속성>
예제코드
resource "local_file" "abc" {
  content  = "123!"
  filename = "${path.module}/abc.txt"
}

data "local_file" "abc" {
  filename = local_file.abc.filename
}

resource "local_file" "def" {
						#프로바이더 파일 유형이 abc content다. => "123!"
  content  = data.local_file.abc.content
  filename = "${path.module}/def.txt"
}
terraform apply -auto-approve
terraform state list
==
data.local_file.abc
local_file.abc
local_file.def
==
# 파일 확인
ls *.txt
diff abc.txt def.txt
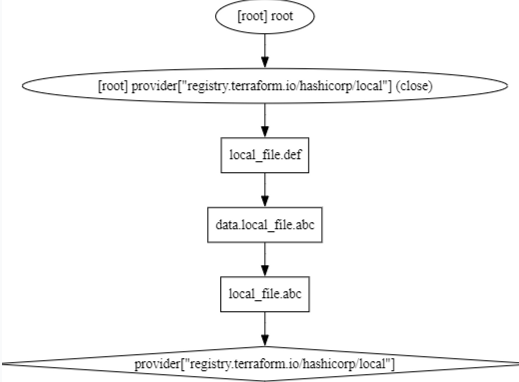
# graph 확인
terraform graph > graph.dot아래 처럼 종속성 확인 가능 합니다.
입력 변수 Variable
입력 변수는 인프라를 구성하는 데 필요한 속성 값을 정의해 코드의 변경 없이 여러 인프라를 생성하는 데 목적이 있다.
테라폼에서는 이것을 입력 변수 Input Variables 로 정의한다.
#실습을 위하여 디렉토리 생성
cd .. && rm -rf 3.5
mkdir 3.6 && cd 3.6- 변수는 variable로 시작되는 블록으로 구성된다. 변수 블록 뒤의 이름 값은 동일 모듈 내 모든 변수 선언에서 고유해야 하며, 이 이름으로 다른 코드 내에서 참조된다.
# variable 블록 선언의 예
variable "<이름>" {
 <인수> = <값>
}

variable "image_id" {
 type = string
}- 테라폼 예약 변수 이름으로 사용 불가능 : source, version, providers, count, for_each, lifecycle, depends_on, locals
- 변수 정의 시 사용 가능한 메타인수
- default : 변수 값을 전달하는 여러 가지 방법을 지정하지 않으면 기본값이 전달됨, 기본값이 없으면 대화식으로 사용자에게 변수에 대한 정보를 물어봄
- type : 변수에 허용되는 값 유형 정의, string number bool list map set object tuple 와 유형을 지정하지 않으면 any 유형으로 간주
- description : 입력 변수의 설명
- validation : 변수 선언의 제약조건을 추가해 유효성 검사 규칙을 정의
- sensitive : 민감한 변수 값임을 알리고 테라폼의 출력문에서 값 노출을 제한
- nullable : 변수에 값이 없어도 됨을 지정
변수 유형
기본 유형
- string : 글자 유형
- number : 숫자 유형
- bool : true 또는 false
- any : 명시적으로 모든 유형이 허용됨을 표시
집합 유형
- list (<유형>): 인덱스 기반 집합
- map (<유형>): 값 = 속성 기반 집합이며 키값 기준 정렬
- set (<유형>): 값 기반 집합이며 정렬 키값 기준 정렬
- object ({<인수 이름>=<유형>, …})
- tuple ([<유형>, …])
- list와 set은 선언하는 형태가 비슷하지만 참조 방식이 인덱스와 키로 각각 차이가 있고, map와 set의 경우 선언된 값이 정렬되는 특징을 가집니다.
기본유형 예시
variable "string" {
  type        = string
  description = "var String"
  default     = "myString"
}

variable "number" {
  type    = number
  default = 123
}

variable "boolean" {
  default = true
}
집합유형 예시
variable "list" {
  default = [
    "google",
    "vmware",
    "amazon",
    "microsoft"
  ]
}

output "list_index_0" {
  value = var.list.0
}

output "list_all" {
  value = [
    for name in var.list : upper(name)
  ]
}

variable "map" { # Sorting
  default = {
    aws   = "amazon",
    azure = "microsoft",
    gcp   = "google"
  }
}

variable "set" { # Sorting
  type = set(string)
  default = [
    "google",
    "vmware",
    "amazon",
    "microsoft"
  ]
}

variable "object" {
  type = object({ name = string, age = number })
  default = {
    name = "abc"
    age  = 12
  }
}

variable "tuple" {
  type    = tuple([string, number, bool])
  default = ["abc", 123, true]
}
유효성 검사 : 입력되는 변수 타입 지징 이외, 사용자 지정 유효성 검사가 가능
variable "image_id" {
  type        = string
  description = "The id of the machine image (AMI) to use for the server."
#validation =>검사를한다
  validation {
											#4글자 이상
    condition     = length(var.image_id) > 4
    error_message = "The image_id value must exceed 4."
  }

  validation {
    # regex(...) fails if it cannot find a match
    condition     = can(regex("^ami-", var.image_id))
    error_message = "The image_id value must starting with \"ami-\"."
  }
}
#
terraform apply -auto-approve
var.image_id
The id of the machine image (AMI) to use for the server.
Enter a value: ami
==
Error: Invalid value for variable
│
│ on main.tf line 1:
│ 1: variable "image_id" {
│ ├────────────────
│ │ var.image_id is "ami"
│
│ The image_id value must starting with "ami-".
│
│ This was checked by the validation rule at main.tf:10,3-13.
==
#
terraform apply -auto-approve
var.image_id
The id of the machine image (AMI) to use for the server.
Enter a value: ami-
===
Error: Invalid value for variable
│
│ on main.tf line 1:
│ 1: variable "image_id" {
│ ├────────────────
│ │ var.image_id is "ami-"
│
│ The image_id value must exceed 4.
│
│ This was checked by the validation rule at main.tf:5,3-13.
===
#
terraform apply -auto-approve
var.image_id
The id of the machine image (AMI) to use for the server.
Enter a value: ami-12345678
===
Apply complete! Resources: 0 added, 0 changed, 0 destroyed.
===변수 참조 : variable은 코드 내에서 var.<이름>으로 참조된다. [코드 재사용성을 조금 올렸다!]
#변수선언
variable "my_password" {}

resource "local_file" "abc" {
  content  = var.my_password
  filename = "${path.module}/abc.txt"
}
#
terraform init -upgrade
terraform apply -auto-approve
var.my_password
Enter a value: orkdo11민감한 변수 취급 : 입력 변수의 민감 여부 선언 가능
- 기본값 추가로 입력 항목은 발생하지 않지만, 출력에서 참조되는 변수 값이(sensitive)로 감춰지는 것을 확인 할 수 있다
variable "my_password" {
  default   = "password"
  sensitive = true
}

resource "local_file" "abc" {
  content  = var.my_password
  filename = "${path.module}/abc.txt"
}
주의사항 : 민감한 변수로 지정해도 terraform.tfstate 파일에는 결과물이 평문으로 기록되므로 State 파일의 보안에 유의해야 한다
⇒terraform.tfstate : 테라폼의 상태 정보 파일이다(테라폼으로 배포한 리소스의 상태가 저장된 terraform.tfstate 파일) , 텍스트로 저장이 된다.
# 출력부분에 내용 안보임!
terraform apply -auto-approve
==
~ content              = (sensitive value) # forces replacement
==

terraform state show local_file.abc
==
content              = (sensitive value)
==
변수 입력 방식과 우선순위
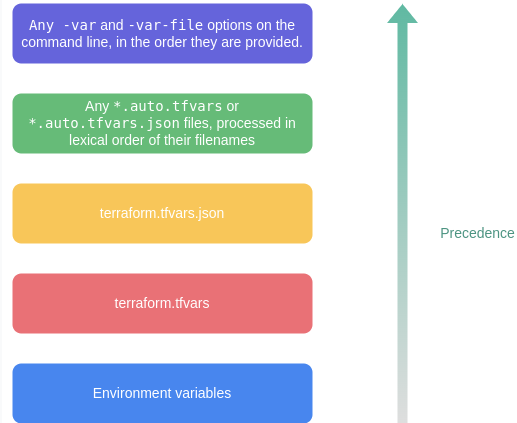
우선순위1
# 실행
terraform apply -auto-approve
var.my_var
  Enter a value: var1
...

# 확인
terraform state show local_file.abc
cat abc.txt ; echo
우선순위2 [variable 블록의 default 값]
variable "my_var" {
  default = "var2"
}

resource "local_file" "abc" {
  content  = var.my_var
  filename = "${path.module}/abc.txt"
}
[우선순위 수준 3] 환경 변수 (TF_VAR 변수 이름)
- 시스템 환경 변수의 접두사에 TF_VAR_ 가 포함되면 그 뒤의 문자열을 변수 이름으로 인식한다.
# Linux/macOS
export TF_VAR_my_var=var3
terraform apply -auto-approve

# 확인
cat abc.txt ; echo
[우선순위 수준 4] terraform.tfvars에 정의된 변수 선언

- 루트 모듈의 main.tf 파일과 같은 위치에 terraform.tfvars 파일을 생성해 변수에 대한 값을 추가하고 앞서 선언한 변수 선언과 비교해 우선순위를 확인
#
echo 'my_var="var4"' > terraform.tfvars
cat terraform.tfvars

#
terraform apply -auto-approve

# 확인
cat abc.txt ; echo
[우선순위 수준 5] *.auto.tfvars에 정의된 변수 선언 (a 보다 b가 높은 식이다..)
# a.auto.tfvars 파일 생성
echo 'my_var="var5_a"' > a.auto.tfvars
ls *.tfvars

#
terraform apply -auto-approve

# 확인
cat abc.txt ; echo


# b.auto.tfvars 파일 생성
echo 'my_var="var5_b"' > b.auto.tfvars
ls *.tfvars

#
terraform apply -auto-approve

# 확인
cat abc.txt ; echo
[우선순위 수준 6] *.auto.tfvars.json에 정의된 변수 선언
(*.auto.tfvars와 같이 파일명의 정렬에 따라 우선순위가 적용된다)
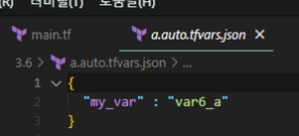
# a.auto.tfvars.json 파일 생성
cat <<EOF > a.auto.tfvars.json
{
  "my_var" : "var6_a"
}
EOF
ls *.tfvars ; ls *.json

#
terraform apply -auto-approve

# 확인
cat abc.txt ; echo


# c.auto.tfvars.json 파일 생성
cat <<EOF > c.auto.tfvars.json
{
  "my_var" : "var6_c"
}
EOF
ls *.tfvars ; ls *.json

#
terraform apply -auto-approve

# 확인
cat abc.txt ; echo
[우선순위 수준 7] CLI 실행 시 -var 인수에 지정 또는 -var-file로 파일 지정
-여러 인수가 선언되는 경우 나중에 선언된 변수의 우선순위가 높다
#
terraform apply -auto-approve -var=my_var=var7
cat abc.txt ; echo

#
terraform apply -auto-approve -var=my_var=var7 -var=my_var=var8
cat abc.txt ; echo
*.tfvars와 같은 형식의 내용의 파일이라면 -var-file로 지정할 수 있다.
# var9.txt 파일 생성
echo 'my_var="var9"' > var9.txt

#
terraform apply -auto-approve -var=my_var=var7 -var-file="var9.txt"
cat abc.txt ; echo
.tfvars 확장자로 생성된 파일에 변수를 미리 기입하면 실행 시 입력해야 하는 변수 값을 하나의 파일에서 관리할 수 있다는 장점이 있다.
[실습 ]VPC and 보안그룹 and EC2 배포 하기
- 목표: VPC 와 보안그룹 그리고 EC2 배포까지 실습 해봅니다.
#신규 디렉토리 생성
mkdir 3.6 && cd 3.6
vpc.tf 파일 생성
provider "aws" {
  region  = "ap-northeast-2"
}

resource "aws_vpc" "myvpc" {
  cidr_block       = "10.10.0.0/16"

  tags = {
    Name = "t101-study"
  }
}
# 배포
terraform init && terraform plan && terraform apply -auto-approve
terraform state list
==
aws_vpc.myvpc
==

terraform state show aws_vpc.myvpc

# VPC 확인
export AWS_PAGER=""
aws ec2 describe-vpcs | jq
aws ec2 describe-vpcs --filter 'Name=isDefault,Values=false' | jq
aws ec2 describe-vpcs --filter 'Name=isDefault,Values=false' --output yaml- AWS 관리콘솔에서 VPC 생성 정보 확인 : DNS 옵션값 확인
- vpc.tf 코드 내용 수정 : VPC DNS 옵션 수정
provider "aws" {
  region  = "ap-northeast-2"
}

resource "aws_vpc" "myvpc" {
  cidr_block       = "10.10.0.0/16"
  enable_dns_support   = true
  enable_dns_hostnames = true

  tags = {
    Name = "t101-study"
  }
}
# 배포
terraform plan && terraform apply -auto-approveAWS 관리콘솔에서 VPC 생성 정보 확인 : DNS 옵션값 확인

vpc.tf 코드 내용 수정 : 서브넷 2개 생성 추가
provider "aws" {
region = "ap-northeast-2"
}
resource "aws_vpc" "myvpc" {
cidr_block = "10.10.0.0/16"
#dns확인 (원래 활성화 되어있음)
enable_dns_support = true
# dns호스트이름
enable_dns_hostnames = true
tags = {
Name = "t101-study"
}
}
resource "aws_subnet" "mysubnet1" {
vpc_id = aws_vpc.myvpc.id
cidr_block = "10.10.1.0/24"
availability_zone = "ap-northeast-2a"
tags = {
Name = "t101-subnet1"
}
}
resource "aws_subnet" "mysubnet2" {
vpc_id = aws_vpc.myvpc.id
cidr_block = "10.10.2.0/24"
availability_zone = "ap-northeast-2c"
tags = {
Name = "t101-subnet2"
}
}
output "aws_vpc_id" {
value = aws_vpc.myvpc.id
}
# 배포
terraform plan && terraform apply -auto-approve
terraform state list
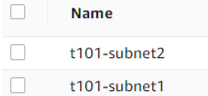
aws_subnet.mysubnet1
aws_subnet.mysubnet2
aws_vpc.myvpc
terraform state show aws_subnet.mysubnet1
terraform output
terraform output aws_vpc_id
terraform output -raw aws_vpc_id
# graph 확인 > graph.dot 파일 선택 후 오른쪽 상단 DOT 클릭
terraform graph > graph.dot
# 서브넷 확인
aws ec2 describe-subnets --output text
# 참고 : aws ec2 describe-subnets --filters "Name=vpc-id,Values=vpc-<자신의 VPC ID>"
VPCID=$(terraform output -raw aws_vpc_id)
aws ec2 describe-subnets --filters "Name=vpc-id,Values=$VPCID" | jq
aws ec2 describe-subnets --filters "Name=vpc-id,Values=$VPCID" --output table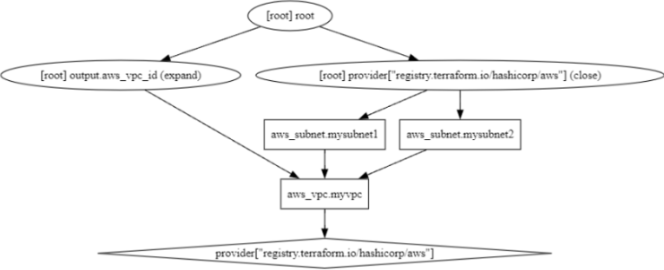
vpc.tf 코드 내용 수정 : IGW 인터넷 게이트웨이 추가
provider "aws" {
  region  = "ap-northeast-2"
}

resource "aws_vpc" "myvpc" {
  cidr_block       = "10.10.0.0/16"
  enable_dns_support   = true
  enable_dns_hostnames = true

  tags = {
    Name = "t101-study"
  }
}

resource "aws_subnet" "mysubnet1" {
  vpc_id     = aws_vpc.myvpc.id
  cidr_block = "10.10.1.0/24"

  availability_zone = "ap-northeast-2a"

  tags = {
    Name = "t101-subnet1"
  }
}

resource "aws_subnet" "mysubnet2" {
  vpc_id     = aws_vpc.myvpc.id
  cidr_block = "10.10.2.0/24"

  availability_zone = "ap-northeast-2c"

  tags = {
    Name = "t101-subnet2"
  }
}

		# aws 프로바이더 유형이 aws_internet_gateway 이다
resource "aws_internet_gateway" "myigw" {
  vpc_id = aws_vpc.myvpc.id

  tags = {
    Name = "t101-igw"
  }
}

output "aws_vpc_id" {
  value = aws_vpc.myvpc.id
}
# 배포
terraform plan && terraform apply -auto-approve
terraform state list
aws_internet_gateway.myigw
aws_subnet.mysubnet1
aws_subnet.mysubnet2
aws_vpc.myvpc
vpc.tf 코드 내용 수정 : IGW 인터넷 게이트웨이로 전달하는 디폴트 라우팅 정보 추가
provider "aws" {
  region  = "ap-northeast-2"
}

resource "aws_vpc" "myvpc" {
  cidr_block       = "10.10.0.0/16"
  enable_dns_support   = true
  enable_dns_hostnames = true

  tags = {
    Name = "t101-study"
  }
}

resource "aws_subnet" "mysubnet1" {
  vpc_id     = aws_vpc.myvpc.id
  cidr_block = "10.10.1.0/24"

  availability_zone = "ap-northeast-2a"

  tags = {
    Name = "t101-subnet1"
  }
}

resource "aws_subnet" "mysubnet2" {
  vpc_id     = aws_vpc.myvpc.id
  cidr_block = "10.10.2.0/24"

  availability_zone = "ap-northeast-2c"

  tags = {
    Name = "t101-subnet2"
  }
}


resource "aws_internet_gateway" "myigw" {
  vpc_id = aws_vpc.myvpc.id

  tags = {
    Name = "t101-igw"
  }
}

#별도의 라우팅 테이블 만든다.
resource "aws_route_table" "myrt" {
  vpc_id = aws_vpc.myvpc.id

  tags = {
    Name = "t101-rt"
  }
}

#  두개의 서브넷이 연동되는 리소스를 각각 만들어 준다. / aws_route_table_association = 라우팅 테이블 연동
resource "aws_route_table_association" "myrtassociation1" {
  subnet_id      = aws_subnet.mysubnet1.id
  route_table_id = aws_route_table.myrt.id
}
#  두개의 서브넷이 연동되는 리소스를 각각 만들어 준다.
resource "aws_route_table_association" "myrtassociation2" {
  subnet_id      = aws_subnet.mysubnet2.id
  route_table_id = aws_route_table.myrt.id
}
# 디폴트 라우팅을 만들어준다.
resource "aws_route" "mydefaultroute" {
  route_table_id         = aws_route_table.myrt.id
#destination_cidr_block은 목적지 IP 주소 범위를 CIDR 표기법으로 지정하는 속성
  destination_cidr_block = "0.0.0.0/0"
  gateway_id             = aws_internet_gateway.myigw.id
}

output "aws_vpc_id" {
  value = aws_vpc.myvpc.id
}
# 배포
terraform plan && terraform apply -auto-approve
terraform state list
aws_internet_gateway.myigw
aws_route.mydefaultroute
aws_route_table.myrt
aws_route_table_association.myrtassociation1
aws_route_table_association.myrtassociation2
aws_subnet.mysubnet1
aws_subnet.mysubnet2
aws_vpc.myvpc
terraform state show aws_route.mydefaultroute
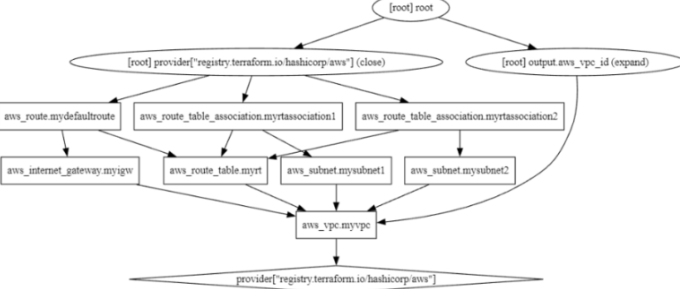
# graph 확인 > graph.dot 파일 선택 후 오른쪽 상단 DOT 클릭
terraform graph > graph.dot
# 라우팅 테이블 확인
#aws ec2 describe-route-tables --filters 'Name=tag:Name,Values=t101-rt' --query 'RouteTables[].Associations[].SubnetId'
aws ec2 describe-route-tables --filters 'Name=tag:Name,Values=t101-rt' --output table
보안그룹/EC2 배포 : sg.tf, ec2.tf
sg.tf 파일 생성 : 보안그룹 생성
resource "aws_security_group" "mysg" {
  vpc_id      = aws_vpc.myvpc.id
  name        = "T101 SG"
  description = "T101 Study SG"
}

resource "aws_security_group_rule" "mysginbound" {
											#인바운드
  type              = "ingress"
#시작하는 포트 번호
  from_port         = 80
#끝 포트 번호로, 이 경우에서도 80입니다. 따라서 이 규칙은 포트 80에서 시작해서 포트 80에서 끝나는 범위가 됩니다.
  to_port           = 80
  protocol          = "tcp"
  cidr_blocks       = ["0.0.0.0/0"]
  security_group_id = aws_security_group.mysg.id
}

resource "aws_security_group_rule" "mysgoutbound" {
											#아웃바운드
  type              = "egress"
  from_port         = 0
  to_port           = 0
#해당 규칙이 적용되는 프로토콜을 지정합니다. 여기서는 "-1"을 사용하고 있어 모든 프로토콜이 해당 규칙에 대해 허용됩니다.
  protocol          = "-1"
  cidr_blocks       = ["0.0.0.0/0"]
  security_group_id = aws_security_group.mysg.id
}
보안그룹 배포
# 배포
ls *.tf
terraform plan && terraform apply -auto-approve
terraform state list
aws_security_group.mysg
aws_security_group_rule.mysginbound
aws_security_group_rule.mysgoutbound
...

terraform state show aws_security_group.mysg
terraform state show aws_security_group_rule.mysginbound

# graph 확인 > graph.dot 파일 선택 후 오른쪽 상단 DOT 클릭
terraform graph > graph.dot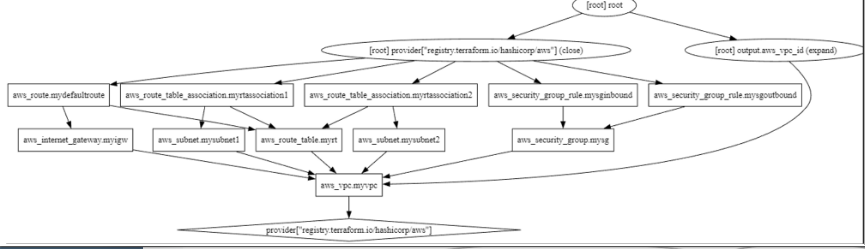
ec2.tf 파일 생성 : EC2 생성
#데이터 소스 블록이 있으며 ami 유형이 있다 my_amazonlinux2 이건 이름이므로 자기 마음대로
data "aws_ami" "my_amazonlinux2" {
#최신 AMI를 사용하려면 true로 설정합니다
  most_recent = true
#원하는 AMI를 찾기 위한 필터를 정의합니다
  filter {
#첫 번째 필터에서 owner-alias를 "amazon"으로 설정하여 Amazon 소유의 이미지만 검색합니다.
    name   = "owner-alias"
    values = ["amazon"]
  }
#두 번째 필터에서 name을 "amzn2-ami-hvm-*-x86_64-ebs"로 설정하여 Amazon Linux 2의 특정 이미지를 검색합니다
  filter {
    name   = "name"
    values = ["amzn2-ami-hvm-*-x86_64-ebs"]
  }
#이미지 소유자를 지정합니다. 여기서는 "amazon"만 포함됩니다.
  owners = ["amazon"]
}
#위에라인들이 속성 값들이며, 데이터 소스를 선언하였다.


resource "aws_instance" "myec2" {

#리소스의 속성을 주입하지 않아도 두 리소스 간에 종속성이 필요한 경우에, depends_on 선언으로 적용 가능
#인터넷 게이트웨이가 있어야지만 그뒤로 넘어감
  depends_on = [
    aws_internet_gateway.myigw
  ]

	#위에 속성 값들을 이용하여 하드 코딩안하고 data 값을 참하여 가져온다 (ami 직접 안적음)
  #검색한 Amazon Linux 2 AMI ID를 사용합니다.
  ami                         = data.aws_ami.my_amazonlinux2.id

#인스턴스에 공용 IP 주소를 연결하려면 true로 설정합니다.
  associate_public_ip_address = true
  instance_type               = "t2.micro"

#시큐리티 그룹 id 가져옴
  vpc_security_group_ids      = ["${aws_security_group.mysg.id}"]
# 서브넷은 두 개인대 1번 가져옴
  subnet_id                   = aws_subnet.mysubnet1.id

#유저데이터 이용
  user_data = <<-EOF
              #!/bin/bash
              wget https://busybox.net/downloads/binaries/1.31.0-defconfig-multiarch-musl/busybox-x86_64
              mv busybox-x86_64 busybox
              chmod +x busybox
#ec2 메타데이터 이용해서 현제 ec2에 배포된 az와 인스턴스 id 프라이빗 ip 을 변수에 넣어주고 index.html 넣는다
              RZAZ=$(curl http://169.254.169.254/latest/meta-data/placement/availability-zone-id)
              IID=$(curl 169.254.169.254/latest/meta-data/instance-id)
              LIP=$(curl 169.254.169.254/latest/meta-data/local-ipv4)
              echo "<h1>RegionAz($RZAZ) : Instance ID($IID) : Private IP($LIP) : Web Server</h1>" > index.html
              nohup ./busybox httpd -f -p 80 &
              EOF

#인스턴스 사용자 데이터가 변경될 때 인스턴스를 다시 생성하려면 true로 설정합니다.
  user_data_replace_on_change = true

  tags = {
    Name = "t101-myec2"
  }
}

#출력 섹션 output "myec2_public_ip": 생성된 인스턴스의 공용 IP 주소를 출력합니다. 이를 통해 생성된 인스턴스에 접근하거나 연결할 수 있습니다.
output "myec2_public_ip" {
  value       = aws_instance.myec2.public_ip
  description = "The public IP of the Instance"
}
배포 실행 후 EC2 확인
#
ls *.tf
terraform plan && terraform apply -auto-approve
terraform state list
data.aws_ami.my_amazonlinux2
aws_instance.myec2
...
terraform state show data.aws_ami.my_amazonlinux2
terraform state show aws_instance.myec2
# 데이터소스 값 확인
terraform console
>
data.aws_ami.my_amazonlinux2.id
"ami-01c81850a6167bb81"
data.aws_ami.my_amazonlinux2.image_id
data.aws_ami.my_amazonlinux2.name
data.aws_ami.my_amazonlinux2.owners
data.aws_ami.my_amazonlinux2.platform_details
data.aws_ami.my_amazonlinux2.hypervisor
data.aws_ami.my_amazonlinux2.architecture
exit
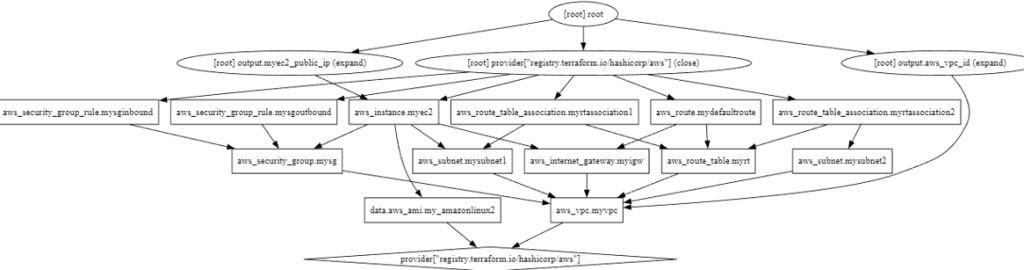
# graph 확인 > graph.dot 파일 선택 후 오른쪽 상단 DOT 클릭
terraform graph > graph.dot
# 출력된 EC2 퍼블릭IP로 cul 접속 확인
terraform output -raw myec2_public_ip
52.79.154.3
MYIP=$(terraform output -raw myec2_public_ip)
while true; do curl --connect-timeout 1 http://$MYIP/ ; echo "------------------------------"; date; sleep 1; done
==
Wed Jul 12 01:46:59 KST 2023
<h1>RegionAz(apne2-az1) : Instance ID(i-02ce6501cd499ffcb) : Private IP(10.10.1.222) : Web Server</h1>
==
실습 완료 하였으면 삭제 합니다
삭제: terraform destroy -auto-approve
local 지역 값
-코드 내에서 사용자가 지정한 값 또는 속성 값을 가공해 참조 가능한 local (지역 값)은 외부에서 입력되지 않고, 코드 내에서만 가공되어 동작하는 값을 선언한다.
-‘local’은 입력 변수와 달리 선언된 모듈 내에서만 접근 가능하고, 변수처럼 실행 시에 입력받을 수 없다.
-다만 lcoals에 선언한 로컬 변수 이름은 전체 루트 모듈 내에서 유일해야 한다.
mkdir 3.7 && cd 3.7  및 main.tf생성

variable "prefix" {
  default = "hello"
}

locals {
  name    = "terraform"
  content = "${var.prefix} ${local.name}"
  my_info = {
    age    = 20
    region = "KR"
  }
  my_nums = [1, 2, 3, 4, 5]
}

locals {
#위에도 content 가있고 여기도 content있어서 에러
  content = "content2" # 중복 선언되었으므로 오류가 발생한다.
}
에러 확인
terraform init
==
Error: Duplicate local value definition
│
│   on main.tf line 16, in locals:
│   16:   content = "content2" # 중복 선언되었으므로 오류가 발생한다.
│
│ A local value named "content" was already defined at main.tf:7,3-42.
│ Local value names must be unique within a module.
==
코드수정
variable "prefix" {
  default = "hello"
}

locals {
  name    = "terraform"

  content = "${var.prefix} ${local.name}"
  my_info = {
    age    = 20
    region = "KR"
  }
  my_nums = [1, 2, 3, 4, 5]
}
local 참조
- 선언된 local 값은 local.<이름>으로 참조할 수 있다.
main.tf 파일
variable "prefix" {
  default = "hello"
}

locals {
  name    = "terraform"
}
#참조한다.
resource "local_file" "abc" {
  content  = local.content
  filename = "${path.module}/abc.txt"
}
sub.tf 파일
locals {
  content = "${var.prefix} ${local.name}"
}
실행 : main.tf의 content 내용 값으로 local.content를 참조하며, 해당 값은 다른 테라폼 구성 파일에 있지만 실행 시점에는 마치 하나의 구성 파일 처럼 올바로 표기되는 것을 확인할 수 있다.
출력 output
출력 값은 주로 테라폼 코드의 프로비저닝 수행 후의 결과 속성 값을 확인하는 용도로 사용된다.
- 루트 모듈에서 사용자가 확인하고자 하는 특정 속성 출력
- 자식 모듈의 특정 값을 정의하고 루트 모듈에서 결과를 참조
- 서로 다른 루트 모듈의 결과를 원격으로 읽기 위한 접근 요소
output 선언
output "instance_ip_addr" {
  value = "http://${aws_instance.server.private_ip}"
}
– 주의할 점은 output 결과에서 리소스 생성 후 결정되는 속성 값은 프로비저닝이 완료되어야 최종적으로 결과를 확인할 수 있고 terraform plan 단계에서는 적용될 값이 출력하지 않는다는 것이다.
– 변수 정의 시 사용 가능한 메타인수
- description : 출력 값 설명
- sensitive : 민감한 출력 값임을 알리고 테라폼의 출력문에서 값 노출을 제한
- depends_on : value에 담길 값이 특정 구성에 종속성이 있는 경우 생성되는 순서를 임의로 조정
- precondition : 출력 전에 지정된 조건을 검증
output 예시
main.tf 파일 생성
mkdir 3.8 && cd 3.8abspath : 파일 시스템 경로를 포함하는 문자열을 가져와 절대 경로로 변환하는 함수
resource "local_file" "abc" {
  content  = "abc123"
  filename = "${path.module}/abc.txt"
}

#파일의 id를 출력한다.
output "file_id" {
  value = local_file.abc.id
}
#파일네임의 절대 경로를 출력한다.
output "file_abspath" {
  value = abspath(local_file.abc.filename)
}
실행 : plan 실행 시, 이미 정해진 속성은 출력을 예측하지만 아직 생성되지 않은 file_id 값은 값의 경우는 결과 예측을 할 수 없다
# plan 실행 시, 이미 정해진 속성은 출력을 예측하지만
terraform init && terraform plan
...
Changes to Outputs:
  + file_abspath = "/Users/gasida/Downloads/workspaces/3.8/abc.txt"
  + file_id      = (known after apply)


#
terraform apply -auto-approve
...
Outputs:
file_abspath = "/home/minho/3.8/abc.txt"
file_id = "6367c48dd193d56ea7b0baad25b19455e529f5ee"

# graph 확인 > graph.dot 파일 선택 후 오른쪽 상단 DOT 클릭
terraform graph > graph.dot

#
terraform state list
terraform output
반복문
count : 반복문, 정수 값만큼 리소스나 모듈을 생성
for_each : 반복문, 선언된 key 값 개수만큼 리소스를 생성
for : 복합 형식 값의 형태를 변환하는 데 사용 ← for_each와 다름니다. (우리가 아는 for문)
dynamic : 리소스 내부 속성 블록을 동적인 블록으로 생성
count
3.9 디렉터리를 신규 생성 후 열기 → main.tf 파일 생성- 리소스 또는 모듈 블록에 count 값이 정수인 인수가 포함된 경우 선언된 정수 값만큼 리소스나 모듈을 생성하게 된다.
- count에서 생성되는 참조값은 count.index이며, 반복하는 경우 0부터 1씩 증가해 인덱스가 부여된다.
resource "local_file" "abc" {
  count    = 5
  content  = "abc"
  filename = "${path.module}/abc.txt"
}

output "filecontent" {
  value = local_file.abc.*.content
}

output "fileid" {
  value = local_file.abc.*.id
}

output "filename" {
  value = local_file.abc.*.filename
}
만약 위에처럼 코드를 작성을 할경에는 파일네임이 동일함으로 우리가 원하는 만큼의 파일이 생성이 되지를 않는다
그럼으로 count.index 를 추가함으로써 파일명을 다르게 해주어 파일을 생성 합니다.
resource "local_file" "abc" {
  count    = 5
#count.index 을 통하여 뒤에 숫자 0부터 주어서 파일명을 다르게 한다
  content  = "abc${count.index}"
  filename = "${path.module}/abc${count.index}.txt"
}

output "fileid" {
  value = local_file.abc.*.id
}

output "filename" {
  value = local_file.abc.*.filename
}

output "filecontent" {
  value = local_file.abc.*.content
}
실행 후 확인
#
terraform apply -auto-approve
terraform state list
ls *.txt
==
abc0.txt  abc1.txt  abc2.txt  abc3.txt  abc4.txt
==

#
terraform console
>
-----------------
local_file.abc[0]
local_file.abc[4]
exit
-----------------

#
terraform output
terraform output filename
terraform output fileid
terraform output filecontent

# graph 확인 > graph.dot 파일 선택 후 오른쪽 상단 DOT 클릭
terraform graph > graph.dot
- 때때로 여러 리소스나 모듈의 count로 지정되는 수량이 동일해야 하는 상황이 있다. 이 경우 count에 부여되는 정수 값을 외부 변수에 식별되도록 구성할 수 있다.
- main.tf 파일 수정 : list 형태의 배열을 활용한 반복문 동작 구성
#변수사용
variable "names" {
						#제약을 걸었다 문자열 값으로
  type    = list(string)
  default = ["a", "b", "c"]
}

resource "local_file" "abc" {
						#length(내장함수): 문자열길이를 합한다 ex) "a", "b", "c" => 3이다.
  count   = length(var.names)
  content = "abc"
  # 변수 인덱스에 직접 접근
  filename = "${path.module}/abc-${var.names[count.index]}.txt"
}

resource "local_file" "def" {
  count   = length(var.names)
  content = local_file.abc[count.index].content
  # element function 활용(리스트(List)나 집합(Set) 타입의 변수에서 주어진 인덱스에 해당하는 요소(element)를 반환하는 함수)
  filename = "${path.module}/def-${element(var.names, count.index)}.txt"
}
위 코드에서 element 함수는 local_file.def 리소스에서 파일명을 생성할 때 사용되었습니다. ${element(var.names, count.index)} 표현식은 var.names 리스트에서 현재 인덱스(count.index)에 해당하는 이름을 반환합니다. 인덱스는 0부터 시작하며, 따라서 element(var.names, count.index) 함수가 반환하는 값은 var.names 리스트에서 count.index에 해당하는 위치의 이름입니다.
예를 들어, names 리스트가 [“a”, “b”, “c”] 이고, count.index가 1일 때 element(var.names, count.index)는 리스트에서 두 번째 위치인 “b”를 반환합니다. 이를 “def-b.txt” 파일명에 연결하여 파일을 생성합니다.
- 실행 후 확인 : local_file.abc와 local_file.def는 var.name에 선언되는 값에 영향을 받아 동일한 갯수만큼 생성하게 된다.
- local_file.def의 경우 local_file.abc와 개수가 같아야 content에 선언되는 인수 값에 오류가 없을 것이므로 서로 참조되는 리소스와 모듈의 반복정의에 대한 공통의 영향을 주는 변수로 관리할 수 있다.
#
terraform apply -auto-approve
terraform state list
ls *.txt
=
abc-a.txt  abc-b.txt  abc-c.txt  def-a.txt  def-b.txt  def-c.txt
=
diff abc-a.txt abc-b.txt
diff abc-a.txt def-c.txt

#
terraform console
>
-----------------
local_file.abc[0]
local_file.def[4]
exit
-----------------

#
terraform output
terraform output filename
terraform output fileid
terraform output filecontent

# graph 확인 > graph.dot 파일 선택 후 오른쪽 상단 DOT 클릭
terraform graph > graph.dotD
- count로 생성되는 리소스의 경우 <리소스 타입>.<이름>[<인덱스 번호>], 모듈의 경우 module.<모듈 이름>[<인덱스 번호>]로 해당 리소스의 값을 참조한다.
- 단, 모듈 내에 count 적용이 불가능한 선언이 있으므로 주의해야 한다.
- 예를 들어 provider 블록 선언부가 포함되어 있는 경우에는 count 적용이 불가능하다 → provider 분리
- 또한 외부 변수가 list 타입인 경우 중간에 값이 삭제되면 인덱스가 줄어들어 의도했던 중간 값에 대한 리소스만 삭제되는 것이 아니라 이후의 정의된 리소스들도 삭제되고 재생성된다.
for_each
– 리소스 또는 모듈 블록에서 for_each에 입력된 데이터 형태가 map 또는 set이면, 선언된 key 값 개수만큼 리소스를 생성하게 된다.
– key 값은 count의 index와는 달리 고유하므로 중간에 값을 삭제한 후 다시 적용해도 삭제한 값에 대해서만 리소스를 삭제한다.
resource "local_file" "abc" {
  for_each = {
    a = "content a"
    b = "content b"
  }
  content  = each.value
										#키는 a,b를 말한다.
  filename = "${path.module}/${each.key}.txt"
}
확인
#
terraform apply -auto-approve
terraform state list
==
local_file.abc["a"]
local_file.abc["b"]
==
ls *.txt
==
a.txt  b.txt
==
cat a.txt ;echo
cat b.txt ;echo

#
terraform console
>
-----------------
local_file.abc
local_file.abc[a]
local_file.abc["a"]
exit
------------------ for_each가 설정된 블록에서는 each 속성을 사용해 구성을 수정할 수 있다
- each.key : 이 인스턴스에 해당하는 map 타입의 key 값
- each.value : 이 인스턴스에 해당하는 map의 value 값
- 생성되는 리소스의 경우 <리소스 타입>.<이름>[<key>], 모듈의 경우 module.<모듈 이름>[<key>]로 해당 리소스의 값을 참조한다.
for
- 예를 들어 list 값의 포맷을 변경하거나 특정 접두사 prefix를 추가할 수도 있고, output에 원하는 형태로 반복적인 결과를 표현할 수 도 있다.
- list 타입의 경우 값 또는 인덱스와 값을 반환
- map 타입의 경우 키 또는 키와 값에 대해 반환
- set 타입의 경우 키 값에 대해 반환
variable "names" {
  default = ["a", "b", "c"]
}

resource "local_file" "abc" {
  content  = jsonencode([for s in var.names : upper(s)]) # 결과 : ["A", "B", "C"]
  filename = "${path.module}/abc.txt"
}
dynamic
- count 나 for_each 구문을 사용한 리소스 전체를 여러 개 생성하는 것 이외도 리소스 내에 선언되는 구성 블록을 다중으로 작성해야 하는 경우가 있다.
- 예를 들면 AWS Security Group 리소스 구성에 ingress, egress 요소가 리소스 선언 내부에서 블록 형태로 여러 번 정의되는 경우다.
resource "aws_security_group" "example" {
name = "example-security-group"
description = "Example security group"
vpc_id. = aws_vpc.main.id
ingress {
from_port = 22
to_port = 22
protocol = "tcp"
cidr_blocks = ["0.0.0.0/0"]
}
ingress {
from_port = 443
to_port = 443
protocol = "tcp"
ipv6_cidr_blocks = ["::/0"]
}
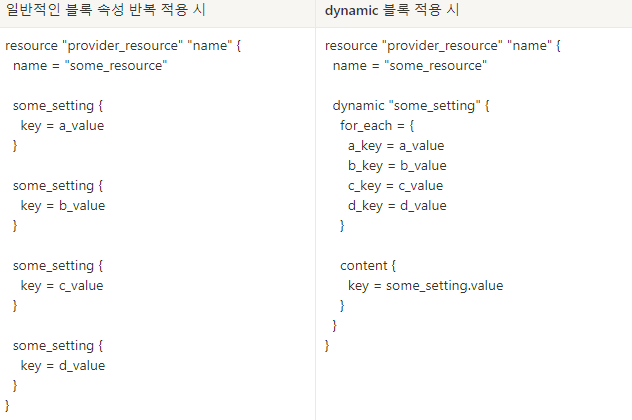
}일반적인 블록 속성 반복 적용 시
resource "provider_resource" "name" {
  name = "some_resource"

  some_setting {
    key = a_value
  }

  some_setting {
    key = b_value
  }

  some_setting {
    key = c_value
  }

  some_setting {
    key = d_value
  }
}
dynamic 블록 적용 시
resource "provider_resource" "name" {
  name = "some_resource"

  dynamic "some_setting" {
    for_each = {
      a_key = a_value
      b_key = b_value
      c_key = c_value
      d_key = d_value
    }

    content {
      key = some_setting.value
    }
  }
}