* cloudNet@ 팀의 가시다 님이 진행하는 AWS Hacking & Security Study 스터디 입니다.
환경 구성
- 자기증명이 된 PC와 자기증명이 안된 EC2로 실습합니다.
- 실습 환경 (VPC, Public Subnet, EC2) – SSH Keypair 필요 : AWS CloudFormation 스택 배포 – 링크 클릭 후 생성 ⇒ 배포 후 EC2 Public IP로 접속 (ec2-user)
- KeyNeame만 사용하시는 Key 설정 후 다음 눌러서 스택 생성 합니다.
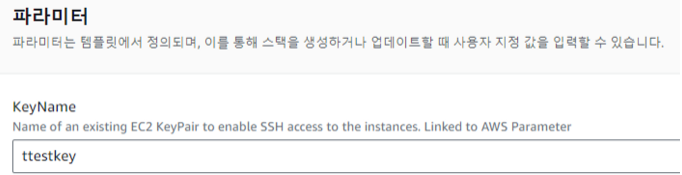
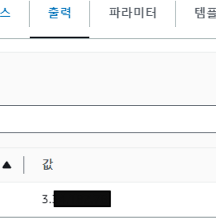
- 완료 후 출력 부분 클릭하면 IP 나오며 해당 IP를 접속하며 실습을 하겠습니다 (EC2 탭으로 가서 확인 가능합니다.)
S3 취약점
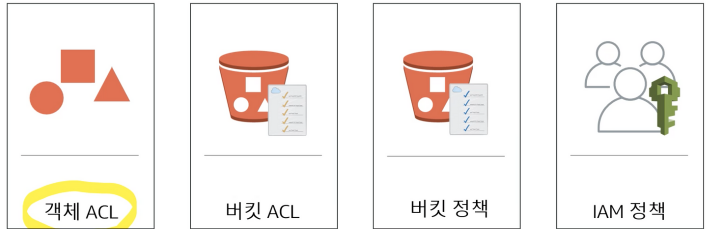
- 객체 & 버킷 액세스 제어 목록 ACL : 액세스 제어 목록(ACL)을 사용하여 버킷 및 객체 각각에 대한 액세스를 제어할 수 있습니다 ← 사용 비권장 함 , 이유는: 개체별 acl은 관리가 안되서
- 버킷 정책 : 버킷 정책은 S3 작업, 요청자, 리소스 및 요청의 여러 측면(예: IP 주소)를 비롯한 다양한 조건을 기반으로 버킷 및 객체에 대한 중앙 집중식 액세스 제어를 제공
- 정책은 액세스 정책 언어로 표현되며 중앙 집중식 권한 관리를 가능하게 합니다. 버킷에 연결되는 권한은 해당 버킷의 모든 객체에 적용됩니다.
- 개별 객체에 대해서만 권한을 추가(부여) 할 수 있는 액세스 제어 목록과 달리, 정책은 버킷 내 모든 객체 또는 객체의 하위 세트에 대해 권한을 추가 또는 거부할 수 있습니다.
- 또한 버킷에 포함된 임의 개수의 객체에 대한 권한을 설정 할 수도 있습니다.
- 버킷 소유자만 정책을 버킷에 연결할 수 있습니다. 액세스 정책 언어로 작성되는 정책은 다음을 기반으로 요청을 허용 또는 거부 합니다.
- S3 버킷 작업(예. PUT ?acl) 및 객체 작업(예: PUT Object 또는 GET Object)
- 요청차
- 정책에 지정된 조건
- 계정은
GetObject,GetObjectVersion,DeleteObject또는DeleteBucket과 같은 특정 Amazon S3 작업을 기반으로 액세스를 제어할 수 있습니다. - 조건은 IP 주소, IP 주소 범위(CIDR 표기법 사용), 날짜, 사용자 에이전트, HTTP 참조자 및 전송(HTTP 및 HTTPS) 등이 될 수 있습니다.
- IAM 정책 : IAM 을 사용하여 S3 리소스에 대한 액세스를 관리할 수 있습니다.
[EC2] nmap 도메인 조회
# -A: OS 감지, 버전 감지, 스크립트 실행 및 traceroute 정보를 활성화
# -Pn: 호스트가 살아있음을 가정하고 핑 스캔을 건너 뜁니다.
nmap -A flaws.cloud -Pn
Starting Nmap 6.40 ( http://nmap.org ) at 2023-08-28 15:43 UTC
Nmap scan report for flaws.cloud (52.218.209.35)
Host is up (0.12s latency).
Other addresses for flaws.cloud (not scanned): 52.218.248.123 52.92.145.59 52.92.160.219 52.92.193.99 52.92.209.51 52.92.227.35 52.218.183.51
rDNS record for 52.218.209.35: s3-website-us-west-2.amazonaws.com   <- 해당 부분을 통하여 S3를 이용했다는 것을 알 수 있습니다.
Not shown: 999 filtered ports
PORT   STATE SERVICE VERSION
80/tcp open  http    Amazon S3 httpd
|_http-methods: No Allow or Public header in OPTIONS response (status code 400)
| http-robots.txt: 1 disallowed entry
|_/
|_http-title: flAWS

Service detection performed. Please report any incorrect results at http://nmap.org/submit/ .
Nmap done: 1 IP address (1 host up) scanned in 19.38 seconds
[EC2] 버킷 탐색
# aws cli 설치된 상태 + IAM 자격증명 설정 없는 상태
aws s3 ls s3://flaws.cloud
Unable to locate credentials. You can configure credentials by running "aws configure".

# aws cli 설치된 상태 + IAM 자격증명 설정 없는 상태 >> 출력 결과가 나오는 이유가 무엇인가?

# --no-sign-request: 이 옵션은 AWS 서명 요청 없이 익명으로 S3 서비스에 액세스하도록 합니다.
    이 옵션을 사용하면, AWS 계정 자격 증명 없이도 퍼블릭으로 공개된 S3 버킷의 내용을 볼 수 있습니다.
# --recursive: 이 옵션은 지정된 경로 안에 있는 모든 파일과 하위 디렉터리를 나열합니다. 이 옵션이 없으면, 최상위 디렉터리만 보여줍니다.
# --human-readable: 파일 크기를 사람이 읽기 쉬운 형태(예: KiB, MiB 등)로 출력합니다.
# --summarize: 전체 개요(총 객체 수, 총 크기 등)를 마지막에 출력합니다.
aws s3 ls s3://flaws.cloud --no-sign-request --recursive --human-readable --summarize
2017-03-14 03:00:38    2.5 KiB hint1.html
2017-03-03 04:05:17    1.7 KiB hint2.html
2017-03-03 04:05:11    1.1 KiB hint3.html
2020-05-22 18:16:45    3.1 KiB index.html
2018-07-10 16:47:16   15.6 KiB logo.png
2017-02-27 01:59:28   46 Bytes robots.txt
2017-02-27 01:59:30    1.0 KiB secret-dd02c7c.html
Total Objects: 7
   Total Size: 25.0 KiB

# 객체 다운로드 >> 다운로드가 되는 이유가 무엇인가?
aws s3 cp s3://flaws.cloud/secret-dd02c7c.html . --no-sign-request

# 파일 내용 확인
file secret-dd02c7c.html
cat secret-dd02c7c.html ; echo

#텍스트 브라우저로 확인
lynx secret-dd02c7c.html

# (옵션) 출력 결과의 링크 정보 확인 후 Level2 풀어 보자!
# Level2 는 해당 옵션으로 안된다.
aws s3 ls s3://level2-c8b217a33fcf1f839f6f1f73a00a9ae7.flaws.cloud --no-sign-request
아래의 실습을 통하여 직접 레벨1,2 실습을 만들어 봅니다.
S3 권한 설정 실습 & IAM Access Analyzer
- [AWS 콘솔] AWS S3 버킷 생성 : 서울 리전
- (옵션) AWS CLI로 실행 : IAM 자격증명 설정 되어 있는 상태 ← AWS CloudShell에서 사용 가능(로그인한 사용자 인증 처리가 됩니다.)
# S3 버킷 생성
#aws s3 mb s3://버킷(유일한 이름) --region ap-northeast-2
NICKNAME=<자신의닉네임>
NICKNAME=sminho
aws s3 mb s3://ahss-$NICKNAME --region ap-northeast-2

# S3 버킷 조회
aws s3 ls
aws s3api get-public-access-block --bucket ahss-$NICKNAME
==
{
    "PublicAccessBlockConfiguration": {
        "BlockPublicAcls": true,
        "IgnorePublicAcls": true,
        "BlockPublicPolicy": true,
        "RestrictPublicBuckets": true
    }
}
==- 생성된 퍼블릭 액세스 차단 기본 설정 확인
aws s3api get-public-access-block --bucket ahss-$NICKNAME | jq
{
  "PublicAccessBlockConfiguration": {
    "BlockPublicAcls": true,
    "IgnorePublicAcls": true,
    "BlockPublicPolicy": true,
    "RestrictPublicBuckets": true
  }
}
#아래의 이미지에서 각 줄이랑 매칭 됩니다.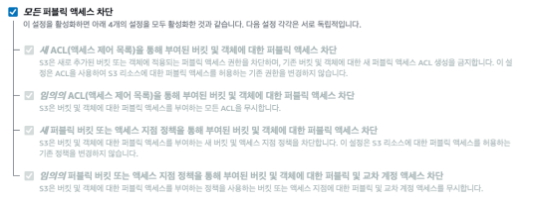
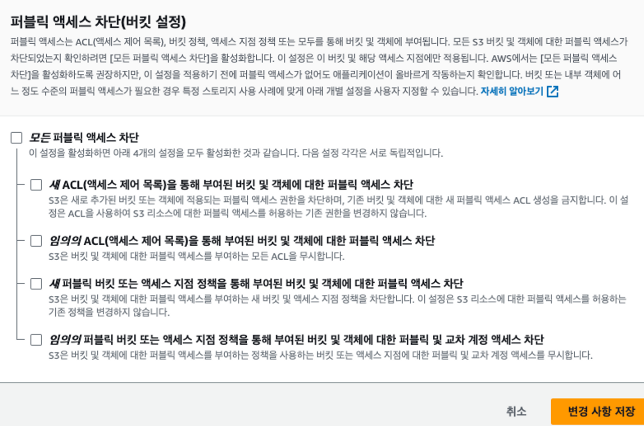
2. [AWS 콘솔] 퍼블릭 액세스 차단 편집 : (Uncheck) 모든 퍼블릭 액세스 차단 → ‘변경 사항 저장’ 클릭 ⇒ ‘확인’ 입력
aws s3api get-public-access-block --bucket ahss-$NICKNAME
{
    "PublicAccessBlockConfiguration": {
        "BlockPublicAcls": false,
        "IgnorePublicAcls": false,
        "BlockPublicPolicy": false,
        "RestrictPublicBuckets": false
    }
}
3. [AWS 콘솔] 버킷에 텍스트 파일 3개 객체 파일 업로드
- (옵션) AWS CLI로 실행 : IAM 자격증명 설정 되어 있는 상태
# 파일 생성
echo "memo1" > memo1.txt
echo "memo2" > memo2.txt
echo "memo3" > memo3.txt

# S3로 업로드
aws s3 cp memo1.txt s3://ahss-$NICKNAME
aws s3 cp memo2.txt s3://ahss-$NICKNAME
aws s3 cp memo3.txt s3://ahss-$NICKNAME

# 파일 확인
aws s3 ls s3://ahss-$NICKNAME --recursive --human-readable --summarize
===
2023-08-29 01:18:03    6 Bytes memo1.txt
2023-08-29 01:18:05    6 Bytes memo2.txt
2023-08-29 01:18:07    6 Bytes memo3.txt

Total Objects: 3
   Total Size: 18 Bytes
===
aws s3api list-objects --bucket ahss-$NICKNAME | jq
=======
{
  "Contents": [
    {
      "Key": "memo1.txt",
      "LastModified": "2023-08-28T16:18:03+00:00",
      "ETag": "\"e32fc8d8ec1c393cd8c8c384db18f8b8\"",
      "Size": 6,
      "StorageClass": "STANDARD",
      "Owner": {
        "ID": "d9a4415902c867d85aaf7bae074134a216919f6dab0d6f9089f845d1d003afa4"
      }
    },
    {
      "Key": "memo2.txt",
      "LastModified": "2023-08-28T16:18:05+00:00",
      "ETag": "\"aa4e7f68a7f12dee6ec03c4c0e6b5e02\"",
      "Size": 6,
      "StorageClass": "STANDARD",
      "Owner": {
        "ID": "d9a4415902c867d85aaf7bae074134a216919f6dab0d6f9089f845d1d003afa4"
      }
    },
    {
      "Key": "memo3.txt",
      "LastModified": "2023-08-28T16:18:07+00:00",
      "ETag": "\"3efcb16932fe5b4e308ba7954f8f812f\"",
      "Size": 6,
      "StorageClass": "STANDARD",
      "Owner": {
        "ID": "d9a4415902c867d85aaf7bae074134a216919f6dab0d6f9089f845d1d003afa4"
      }
    }
  ],
  "RequestCharged": null
}
========- [AWS 콘솔] 객체 URL 주소 확인해보자! → 버킷 액세스 방식 확인 : 가상 호스팅 방식, S3 액세스 포인트, S3://를 사용
- 가상 호스팅 방식 : https://bucket-name.s3.Region.amazonaws.com/key-name
4. [EC2] 자신의 버킷 탐색 (자격증명 X)
# 출력 결과의 원인을 유추해보자!
NICKNAME=<자신의닉네임>
NICKNAME=sminho
aws s3 ls s3://ahss-$NICKNAME --human-readable
aws s3 ls s3://ahss-$NICKNAME --human-readable --no-sign-request
==
#error 문구가 좀 다르게 나옵니다 아래의 설정을 통하여 레벨 1 맞춰 봅니다.
An error occurred (AccessDenied) when calling the ListObjectsV2 operation: Access Denied
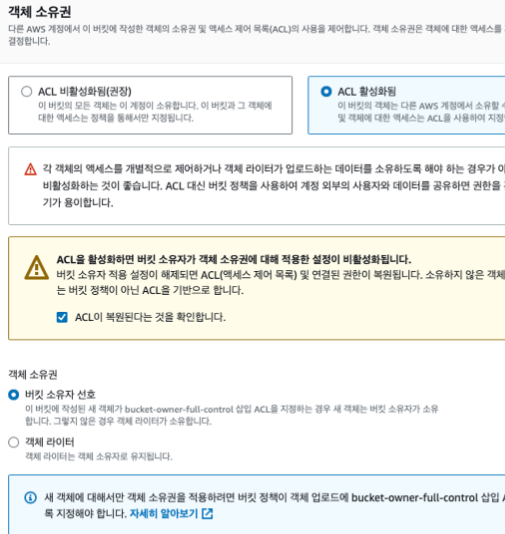
==5. [AWS 콘솔] 권한 → 객체 소유권 편집 : ‘ACL 활성화’ , ‘버킷 소유자 선호’
6. [AWS 콘솔] 권한 → ACL(액세스 제어 목록) 편집 : 모든사람(퍼블릭 액세스) – 객체 (Check 나열) → ‘변경 사항 저장’
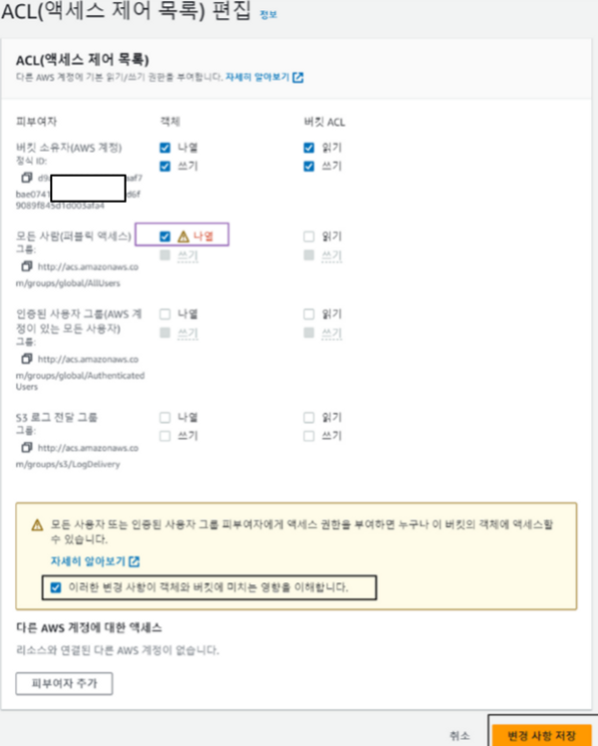

ㄴ퍼블릭 확인 합니다.
1. 다시 명령어 입력 [EC2] 자신의 버킷 탐색
# 탐색 실행
#레벨 1 이랑 같은 결과 확인 => 모든 사람 나열 승인!
aws s3 ls s3://ahss-$NICKNAME --human-readable --no-sign-request
==
2023-08-28 16:18:03 6 Bytes memo1.txt
2023-08-28 16:18:05 6 Bytes memo2.txt
2023-08-28 16:18:07 6 Bytes memo3.txt
==
# 파일 복사 실행 : 출력 결과의 원인을 유추해보자!
aws s3 cp s3://ahss-$NICKNAME/memo1.txt . --no-sign-request
==
fatal error: An error occurred (403) when calling the HeadObject operation: Forbidden
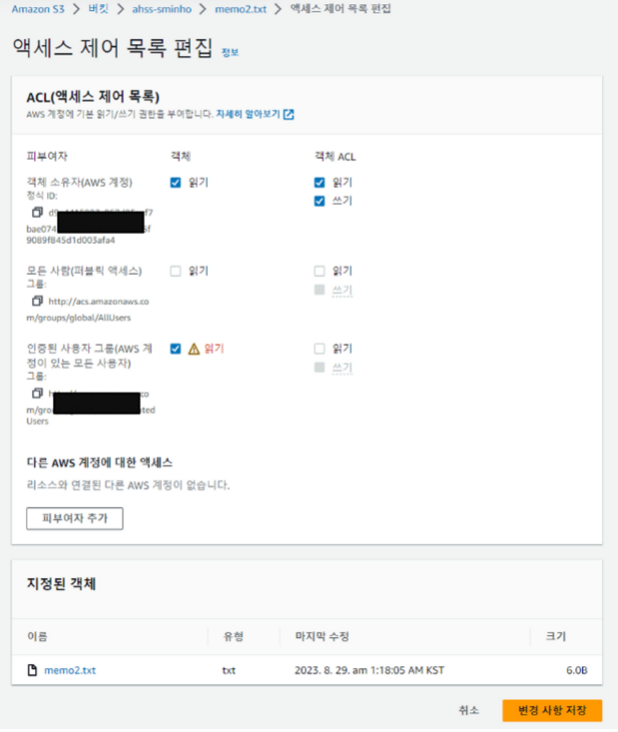
==2. [AWS 콘솔] 객체 별 권한 설정
- memo1.txt : 모든사람(퍼블릭 액세스) – 객체 (Check 읽기) → ‘변경 사항 저장’
- memo2.txt : 인증된 사용자 그룹(AWS 계정이 있는 모든 사용자) – 객체 (Check 읽기) → ‘변경 사항 저장’
3. [자신의 PC] IAM 자격증명 설정 되어 있는 상태 – 버킷에 객체 복사
# 자격증명이 되어 있어서 원래가능
aws s3 cp s3://ahss-$NICKNAME/memo2.txt .
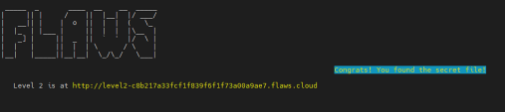
# flaws.cloud Level2
# 내 버킷이 아닌대도 나오는 이유는 유효한 크레덴셜이면 누구나 가능합니다. (=aws configure 설정만 되면)
aws s3 ls s3://level2-c8b217a33fcf1f839f6f1f73a00a9ae7.flaws.cloud --human-readable
aws s3 cp s3://level2-c8b217a33fcf1f839f6f1f73a00a9ae7.flaws.cloud/secret-e4443fc.html .
cat secret-e4443fc.html4. [AWS 콘솔] 리소스 정책 : 버킷 정책 설정 – 편집 클릭 후 아래 내용 입력 후 ‘변경 사항 저장’ (사용 시 주석 제거)
{
    "Version": "2012-10-17",
    "Statement": [
        {
           "Sid": "PublicReadGetObject",  // 정책 문장의 식별자입니다. 이는 선택 사항이며, 관리 목적으로 사용됩니다.
"Effect": "Allow",  // 이 정책 문장이 허용되는지("Allow") 아니면 거부되는지("Deny")를 나타냅니다.
"Principal": "*",  // 이 정책 문장이 적용되는 주체를 나타냅니다. "*"은 모든 사용자를 의미합니다.
"Action": "s3:GetObject",  // 해당 권한에서 허용하거나 거부하는 작업을 나타냅니다. 여기서는 S3 객체를 가져오는(GetObject) 작업을 의미합니다.
"Resource": "arn:aws:s3:::ahss-닉네임/*"  // 이 정책 문장이 적용되는 리소스를 나타냅니다. 여기서는 'ahss-닉네임'라는 이름의 모든 S3 객체(*로 지정됨)가 해당됩니다.
        }
    ]
}- 설정 후 aws cli 로 S3 버킷 정책 확인
aws s3api get-bucket-policy --bucket ahss-$NICKNAME | jq -r .Policy | jq
==
{
  "Version": "2012-10-17",
  "Statement": [
    {
      "Sid": "PublicReadGetObject",
      "Effect": "Allow",
      "Principal": "*",
      "Action": "s3:GetObject",
      "Resource": "arn:aws:s3:::ahss-sminho/*"
    }
  ]
}
==
5. [EC2] 자신의 버킷 탐색 → 아래와 같은 (리소스 정책) 버킷 정책은 언제 필요할까?
# 파일 복사 실행 : 출력 결과의 원인을 유추해보자!
aws s3 cp s3://ahss-$NICKNAME/memo1.txt . --no-sign-request
==
download: s3://ahss-sminho/memo1.txt to ./memo1.txt
==

# 파일 복사 실행 : 출력 결과의 원인을 유추해보자!
aws s3 cp s3://ahss-$NICKNAME/memo2.txt . --no-sign-request
==
download: s3://ahss-sminho/memo2.txt to ./memo2.txt
==

# 파일 복사 실행 : 출력 결과의 원인을 유추해보자!
aws s3 cp s3://ahss-$NICKNAME/memo3.txt . --no-sign-request
==
download: s3://ahss-sminho/memo3.txt to ./memo3.txt
==
S3의 객체 ACL을 활성화하는 사례 요약 – 링크
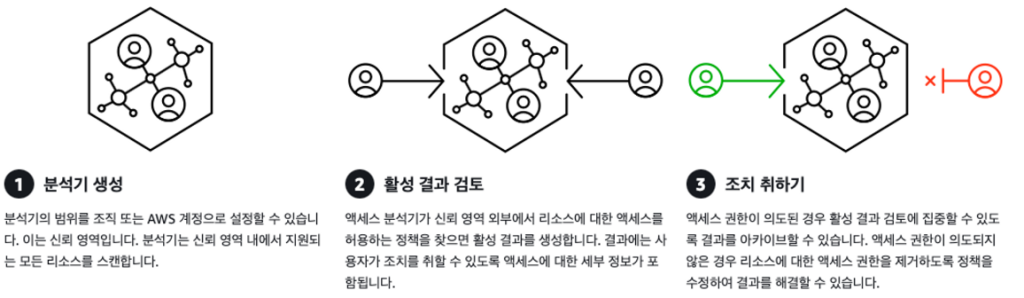
# 액세스 분석기 생성
# 자격증명 필요
#aws accessanalyzer create-analyzer --analyzer-name firstanalyzer --type ACCOUNT --output text --query arn
ANA_ARN=$(aws accessanalyzer create-analyzer --analyzer-name firstanalyzer --type ACCOUNT --output text --query arn)
echo $ANA_ARN
==
arn:aws:access-analyzer:ap-northeast-2:276281595736:analyzer/firstanalyzer
==

# S3 버킷 스캔 수행
# 기본적으로 자동으로 스캔 합니다.
aws accessanalyzer start-resource-scan --analyzer-arn $ANA_ARN --resource-arn arn:aws:s3:::ahss-$NICKNAME

# S3 버킷 스캔 결과 확인
aws accessanalyzer get-analyzed-resource --analyzer-arn $ANA_ARN --resource-arn arn:aws:s3:::ahss-$NICKNAME | jq
{
  "resource": {
    "resourceArn": "arn:aws:s3:::ahss-sminho",
    "resourceType": "AWS::S3::Bucket",
    "createdAt": "2023-08-28T17:05:46.790000+00:00",
    "analyzedAt": "2023-08-28T17:07:57.535000+00:00",
    "updatedAt": "2023-08-28T17:05:46.790000+00:00",
    "isPublic": true,
    "actions": [
      "s3:GetObject",
      "s3:ListBucket",
      "s3:ListBucketMultipartUploads",
      "s3:ListBucketVersions"
    ],
    "sharedVia": [
      "BUCKET_ACL",
      "POLICY"
    ],
    "status": "ACTIVE",
    "resourceOwnerAccount": "2.."
  }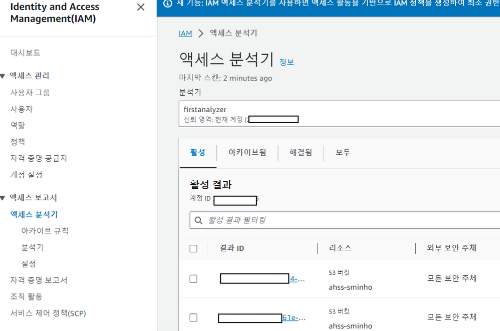
}- 콘솔에서 [AWS 콘솔] IAM – IAM – 액세스 보고서 – 액세스 분석기 에서 확인 가능 합니다.
- 버킷에 대한 퍼블릭 액세스 차단 설정
aws s3api put-public-access-block --bucket ahss-$NICKNAME --public-access-block-configuration \
"BlockPublicAcls=true,IgnorePublicAcls=true,BlockPublicPolicy=true,RestrictPublicBuckets=true"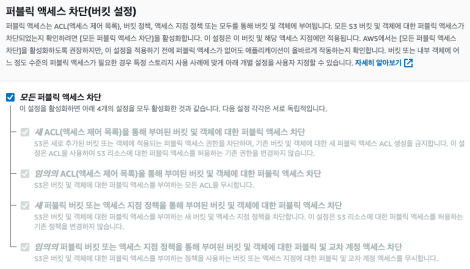
- 실습 완료 후 액세스 분석기 삭제하여 줍니다.
aws accessanalyzer delete-analyzer --analyzer-name firstanalyzer- 버킷 삭제
# 버킷에 객체 모두 삭제
aws s3 rm s3://ahss-$NICKNAME --recursive

# 실습에 사용한 S3 버킷 삭제
aws s3 rb s3://ahss-$NICKNAME

# 확인
aws s3 ls
S3 보안 강화
S3 기능
Pre-signed URL & 버킷 생성 : 서명된 URL(만료 날짜)로 AWS 보안자격증명이나 권한이 없어도, 객체 업로드/다운로드 가능
- [자신의 PC] IAM 자격증명 설정 되어 있는 상태
# S3 버킷 생성
NICKNAME=<자신의닉네임>
NICKNAME=sminho
aws s3 mb s3://ahss-$NICKNAME-presign --region ap-northeast-2

# 확인
aws s3 ls
==
2023-08-30 00:23:21 ahss-sminho-presign
2023-07-09 23:32:30 aws-waf-logs-minho
2023-06-28 20:36:00 elasticbeanstalk-ap-northeast-2-373523363156
2023-05-27 23:22:32 minho-wp-bucket
==
aws s3api get-public-access-block --bucket ahss-$NICKNAME-presign | jq
==
{
  "PublicAccessBlockConfiguration": {
    "BlockPublicAcls": true,
    "IgnorePublicAcls": true,
    "BlockPublicPolicy": true,
    "RestrictPublicBuckets": true
  }
}
==

# 그림파일 다운로드
curl https://www.nasa.gov/sites/default/files/thumbnails/image/main_image_star-forming_region_carina_nircam_final-5mb.jpg -o jameswebb.jpg

# S3로 업로드
aws s3 cp jameswebb.jpg s3://ahss-$NICKNAME-presign

# 파일 확인
aws s3 ls s3://ahss-$NICKNAME-presign --human-readable
==
2023-08-30 00:25:14    5.1 MiB jameswebb.jpg
==

aws s3api list-objects --bucket ahss-$NICKNAME-presign | jq
==
{
  "Contents": [
    {
      "Key": "jameswebb.jpg",
      "LastModified": "2023-08-29T15:25:14+00:00",
      "ETag": "\"3bae2c6845352e627516a529fd507ffb\"",
      "Size": 5310371,
      "StorageClass": "STANDARD",
      "Owner": {
        "ID": "78d3a894fc40d80020c8ff7ba28dbeeedc5acb79eb2305a78af4f740b3b87f96"
      }
    }
  ],
  "RequestCharged": null
}
==- [EC2] 자격증명 없는 상태
#
NICKNAME=<자신의닉네임>
NICKNAME=ssminho
aws s3 ls s3://ahss-$NICKNAME-presign --human-readable --no-sign-request
==
An error occurred (AccessDenied) when calling the ListObjectsV2 operation: Access Denied
==

# 객체URL로 웹 접근 시도
lynx --dump https://ahss-$NICKNAME-presign.s3.ap-northeast-2.amazonaws.com/jameswebb.jpg
==
AccessDeniedAccess
   DeniedVCB5AKNXD6X213PTkKXVCxaHOBYmStnBNsOTF1xuXkPBt63mo5VvUC3IrJ7d8Chj1
   9isulj9A42tECElxDQNqEkhquU=
==- [자신의 PC] IAM 자격증명 설정 되어 있는 상태
# 사전 서명된 URL 생성 : 600초(10분)
aws s3 presign s3://ahss-$NICKNAME-presign/jameswebb.jpg --expires-in 600
https://cass-s3bucket4-gasida.s3.ap-northeast-2.amazonaws.com/jameswebb.jpg- [EC2] 자격증명 없는 상태
# 변수 지정
URL='<서명된 URL>'
URL='https://ahss-gasida-presign.s3.ap-northeast-2.amazonaws.com/memo1.txt

# 서명된 URL 접속 확인
curl -O $URL
ls -al *.jpg
==
-rw-rw-r-- 1 ec2-user ec2-user 5310371 Aug 29 15:29 jameswebb.jpg
==- 서명된 URL 주소를 10분 이내에 아무 단말/PC의 웹 브라우저에서 접속 가능합니다.

AWS Workshop S3 Security Best Pratices & Configuring Amazon S3 security settings and access controls
- [자신의 PC] IAM 자격증명 설정 되어 있는 상태
# object's metadata 정보 확인 : ServerSideEncryption 확인
aws s3api head-object help
aws s3api head-object --bucket ahss-$NICKNAME-presign --key jameswebb.jpg | jq
==
{
  "AcceptRanges": "bytes",
  "LastModified": "2023-08-29T16:03:22+00:00",
  "ContentLength": 5310371,
  "ETag": "\"3bae2c6845352e627516a529fd507ffb\"",
  "ContentType": "image/jpeg",
  "ServerSideEncryption": "AES256",  # 기본적으로 암호화 버킷이 설정됨을 확인
  "Metadata": {}
}
==

# object's metadata 정보 확인 : endpoint-url 옵션 설정
aws s3api head-object --bucket ahss-$NICKNAME-presign --key jameswebb.jpg --endpoint-url http://s3.ap-northeast-2.amazonaws.com
aws s3api head-object --bucket ahss-$NICKNAME-presign --key jameswebb.jpg --endpoint-url https://s3.ap-northeast-2.amazonaws.com- [AWS 콘솔] 버킷 정책 설정 – 편집 클릭 후 아래 내용 입력 후 ‘변경 사항 저장’ (강제로 )
{
	"Id": "S3-Security-Deny-unless-HTTPS",
	"Version": "2012-10-17",
	"Statement": [{
		"Action": "s3:*",
		"Effect": "Deny",
		"Principal": "*",
		"Resource": "arn:aws:s3:::ahss-닉네임-presign/*",
		"Condition": {
			"Bool": {
				"aws:SecureTransport": false # http 연결일경우 차단입니다.
			}
		}
	}]
}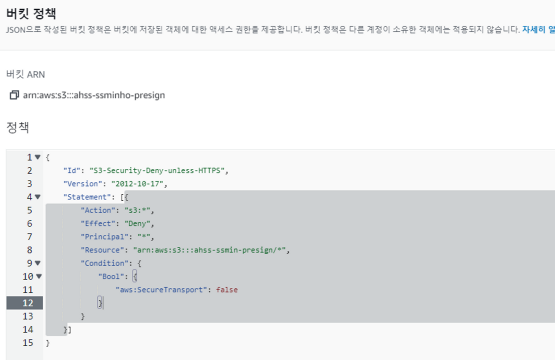
- 설정 후 aws cli 로 S3 버킷 정책 확인
aws s3api get-bucket-policy --bucket ahss-$NICKNAME-presign | jq -r .Policy | jq
==
{
  "AcceptRanges": "bytes",
  "LastModified": "2023-08-29T16:03:22+00:00",
  "ContentLength": 5310371,
  "ETag": "\"3bae2c6845352e627516a529fd507ffb\"",
  "ContentType": "image/jpeg",
  "ServerSideEncryption": "AES256",
  "Metadata": {}
}
==- [자신의 PC] IAM 자격증명 설정 되어 있는 상태
# object's metadata 정보 확인 : endpoint-url 옵션 설정 >> http? https? 확인
# 아래의 결과와 같이 강제로 https로 가능합니다.
aws s3api head-object --bucket ahss-$NICKNAME-presign --key jameswebb.jpg --endpoint-url http://s3.ap-northeast-2.amazonaws.com
==
An error occurred (403) when calling the HeadObject operation: Forbidden
==

aws s3api head-object --bucket ahss-$NICKNAME-presign --key jameswebb.jpg --endpoint-url https://s3.ap-northeast-2.amazonaws.com
==
{
    "AcceptRanges": "bytes",
    "LastModified": "2023-08-29T16:03:22+00:00",
    "ContentLength": 5310371,
    "ETag": "\"3bae2c6845352e627516a529fd507ffb\"",
    "ContentType": "image/jpeg",
    "ServerSideEncryption": "AES256",
    "Metadata": {}
}
==- 서버 측 암호화는 S3 관리 키(SSE-S3)를 사용한 서버 측 암호화, KMS 관리키(SSE-KMS)를 사용한 서버 측 암호화, 고객 측에 제공된 키(SSE-C)를 사용한 서버 측 암호화가 있다. 클라이언트 측 암호화에서는 데이터가 클라이언트 측에서 암호화된 다음 서버로 전송된다.
- [자신의 PC] IAM 자격증명 설정 되어 있는 상태
# 캑체 버킷에 업로드
# default bucket encryption to SSE-KMS(AES256) to encrypt your data at rest and enforce encryption with a bucket policy.
#'textfile'이라는 파일의 내용을 'text01'이라는 이름으로 S3 버킷에 업로드하고, 그 결과 해당 객체가 서버 측에서 AES256 방식으로 암호화되었음을 보여줍니다.
echo "123456789abcdefg" > textfile
aws s3api put-object --key text01 --body textfile --bucket ahss-$NICKNAME-presign
{
    "ETag": "\"3ca451faac980583cffaadf8b63e6820\"",
    "ServerSideEncryption": "AES256"
}

#
aws s3api head-object --bucket ahss-$NICKNAME-presign --key text01 | jq- [AWS 콘솔] 버킷 속성 → 기본 암호화 (편집) : AWS KMS(SSE-KMS), AWS KMS키 중 선택(s3), 버킷 키(활성화)
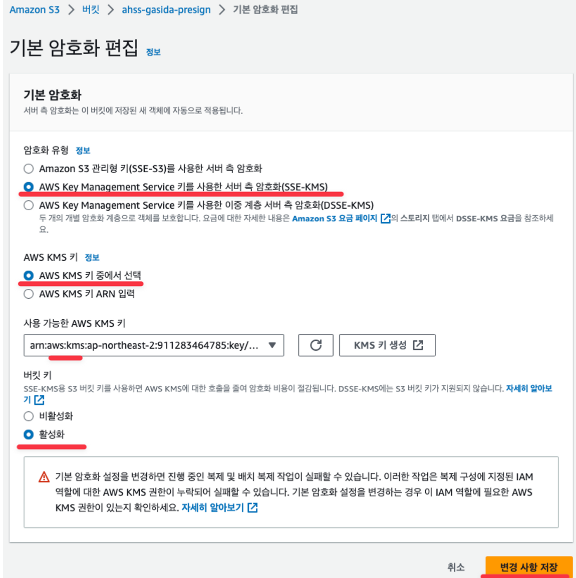
*사용가능한 키 선택 시 아래 이미지 처럼 회색으로 aws/s3 선택 합니다.

- [자신의 PC] IAM 자격증명 설정 되어 있는 상태
# object's metadata 정보 확인 : ServerSideEncryption 확인
aws s3api head-object --bucket ahss-$NICKNAME-presign --key jameswebb.jpg | jq

# 캑체 버킷에 업로드
# default bucket encryption to SSE-KMS(AES256) to encrypt your data at rest and enforce encryption with a bucket policy.
echo "abcdef" > textfile2
aws s3api put-object --key text02 --body textfile2 --bucket ahss-$NICKNAME-presign | jq
{
  "ETag": "\"aceb2413d6d0a7837f2d775144ff010a\"",
  "ServerSideEncryption": "aws:kms",
  "SSEKMSKeyId": "arn:aws:kms:ap-northeast-2:276281595736:key/c790ffcd-72d7-48d0-9f97-a079d5aeb50e",
  "BucketKeyEnabled": true
}

# object's metadata 정보 확인 : ServerSideEncryption 확인
#kms 확인
aws s3api head-object --bucket ahss-$NICKNAME-presign --key text02 | jq
===
{
  "AcceptRanges": "bytes",
  "LastModified": "2023-08-29T16:39:02+00:00",
  "ContentLength": 7,
  "ETag": "\"aceb2413d6d0a7837f2d775144ff010a\"",
  "ContentType": "binary/octet-stream",
  "ServerSideEncryption": "aws:kms",
  "Metadata": {},
  "SSEKMSKeyId": "arn:aws:kms:ap-northeast-2:276281595736:key/c790ffcd-72d7-48d0-9f97-a079d5aeb50e",
  "BucketKeyEnabled": true
}
===
IAM 정책 실습
- [자신의 PC] IAM 자격증명 설정 되어 있는 상태 : IAM User 생성 및 S3 권한 부여
- 해당 계정 생성 부분은 선택 입니다.
# s3user 사용자 생성
aws iam create-user --user-name s3user

# iam 사용자 리스트 확인
aws iam list-users | jq

# 사용자에게 프로그래밍 방식 액세스 권한 부여
aws iam create-access-key --user-name s3user
{
    "AccessKey": {
        "UserName": "s3user",
        "AccessKeyId": "Y6X",
        "Status": "Active",
        "SecretAccessKey": "BlWqQ",
        "CreateDate": "2023-08-27T04:32:47+00:00"
    }
}

# s3user 사용자에 AWS관리형정책(AmazonS3FullAccess)을 추가
aws iam attach-user-policy --policy-arn arn:aws:iam::aws:policy/AmazonS3FullAccess --user-name s3user- [EC2] 자격증명 없는 상태 : s3user 사용자 자격증명 설정 후 확인 (만들었을 겨우)
# aws cli 명령 시도
aws s3 ls
aws ec2 describe-vpcs

# s3user 자격증명 profile
aws configure
AWS Access Key ID [None]: AKIA5I..
AWS Secret Access Key [None]: 2XpI+7efp8YGM..
Default region name [None]: ap-northeast-2
Default output format [None]:

# 자격 증명 정보 저장되는 파일 확인
cat ~/.aws/credentials

# aws cli 명령 시도
aws s3 ls
==
2023-08-29 16:38:23 ahss-ssminho-presign
==

aws ec2 describe-vpcs


# 퍼블릭 액세스 차단 비활성 설정
aws s3api put-public-access-block --bucket ahss-$NICKNAME-presign --public-access-block-configuration \
"BlockPublicAcls=false,IgnorePublicAcls=false,BlockPublicPolicy=false,RestrictPublicBuckets=false"- [AWS 콘솔] 리소스 정책 : 버킷 정책 설정 – 편집 클릭 후 아래 내용 입력 후 ‘변경 사항 저장’
{
    "Version": "2012-10-17",
    "Statement": [
        {
            "Sid": "PublicReadGetObject",
            "Effect": "Allow",
            "Principal": "*",
						#모든 객체를 다운 가능하다. 누구나
            "Action": "s3:GetObject",
            "Resource": "arn:aws:s3:::ahss-닉네임-presign/*"
        }
    ]
}- 설정 후 aws cli 로 S3 버킷 정책 확인
aws s3api get-bucket-policy --bucket ahss-$NICKNAME-presign | jq -r .Policy | jq
==
{
  "Version": "2012-10-17",
  "Statement": [
    {
      "Sid": "PublicReadGetObject",
      "Effect": "Allow",
      "Principal": "*",
      "Action": "s3:GetObject",
      "Resource": "arn:aws:s3:::ahss-ssminho-presign/*"
    }
  ]
}
==- [자신의 PC] and [EC2] : 객체 다운로드 시도 (실습:EC2 에서는 다운 가능하게 하고 PC로는 다운 불가능하게 해보기)
# 파일 복사 실행
aws s3 cp s3://ahss-$NICKNAME-presign/jameswebb.jpg .

# [EC2] 미리 자신의 공인 IP 확인 메모해두기
curl ipinfo.io
curl ipinfo.io/ip ;echo- [AWS 콘솔] 리소스 정책 : 버킷 정책 설정 – 편집 클릭 후 아래 내용 입력 후 ‘변경 사항 저장’ ← IP주소는 EC2의 공인 IP 입력
- 부정의 부정은 긍정이라고 생각하시면 됩니다.
{
    "Statement": [
        {
            "Effect": "Deny",
            "Principal": "*",
            "Action": [
                "s3:PutObject",
                "s3:GetObject",
                "s3:ListBucket"
            ],
            "Resource": [
                "arn:aws:s3:::ahss-닉네임-presign",
                "arn:aws:s3:::ahss-닉네임-presign/*"
            ],
            "Condition": {
								#해당 IP를 제외한 업로드, 다운로드, 리스트 를 제안한다.
                "NotIpAddress": {
                    "aws:SourceIp": "X.X.X.X/32"     #EC2의 IP 입력 합니다.
                }
            }
        }
    ]
}- 설정 후 aws cli 로 S3 버킷 정책 확인
aws s3api get-bucket-policy --bucket ahss-$NICKNAME-presign | jq -r .Policy | jq
==
{
  "Version": "2008-10-17",
  "Statement": [
    {
      "Effect": "Deny",
      "Principal": "*",
      "Action": [
        "s3:PutObject",
        "s3:GetObject",
        "s3:ListBucket"
      ],
      "Resource": [
        "arn:aws:s3:::ahss-ssminho-presign",
        "arn:aws:s3:::ahss-ssminho-presign/*"
      ],
      "Condition": {
        "NotIpAddress": {
          "aws:SourceIp": "52.78.6.51/32"
        }
      }
    }
  ]
}
==- [자신의 PC] and [EC2]
# [자신의 PC] 파일 생성
echo "memo1" > memo1.txt

# [자신의 PC] S3로 업로드
aws s3 cp memo1.txt s3://ahss-$NICKNAME-presign
==
upload failed: ./memo1.txt to s3://ahss-ssminho-presign/memo1.txt An error occurred (AccessDenied) when calling the PutObject operation: Access Denied
==

# [자신의 PC] 버킷 조회
aws s3 ls s3://ahss-$NICKNAME-presign
==
An error occurred (AccessDenied) when calling the ListObjectsV2 operation: Access Denied
==

aws s3api list-objects --bucket ahss-$NICKNAME-presign | jq
==
An error occurred (AccessDenied) when calling the ListObjects operation: Access Denied
==


# [EC2] 파일 생성
echo "memo2" > memo2.txt

# [EC2] S3로 업로드
aws s3 cp memo2.txt s3://ahss-$NICKNAME-presign
==
upload: ./memo2.txt to s3://ahss-ssminho-presign/memo2.txt
==

# [EC2] 버킷 조회
aws s3 ls s3://ahss-$NICKNAME-presign
==
2023-08-29 16:03:22    5310371 jameswebb.jpg
2023-08-30 14:32:21          6 memo2.txt
2023-08-29 16:31:11         17 text01
2023-08-29 16:39:02          7 text02
==

aws s3api list-objects --bucket ahss-$NICKNAME-presign | jq
Auditing Amazon S3’s Default Encryption Configurations at Scale & AWS SDK(boto3)
# boto3 설치
# boto3 이용하여 버킷 조회 가능합니다.
sudo python3 -m pip install boto3

# 버킷 리스트 조회
cat <<EOT > bucket-all.py
import boto3

s3 = boto3.resource('s3')
for bucket in s3.buckets.all():
  print(bucket.name)
EOT
python3 bucket-all.py#
git clone https://github.com/aws-samples/amazon-s3-default-encryption-audit
cd amazon-s3-default-encryption-audit/
tree
#
python3 amazon-s3-default-encryption-audit.py
...
Output Location: /home/ec2-user/
You can now access the report in the following location:
/home/ec2-user/bucketEncryptionReport_20230827-054611.csv
#버킷이름, 암호화 적용, 버킷 키, 타입 등 확인 가능합니다.
cat bucketEncryptionReport_20230830-145755.csv
==
Bucket Name,Default Encryption Mode,SSE-KMS Key Type,Bucket Key
ahss-ssminho-presign, arn:aws:kms:ap-northeast-2:272..36:key/c.....eb50e, AWS, True
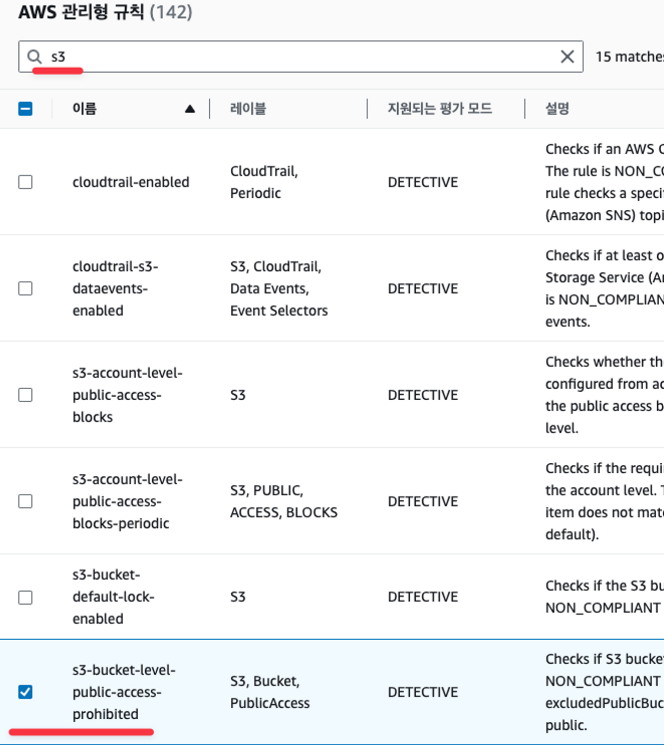
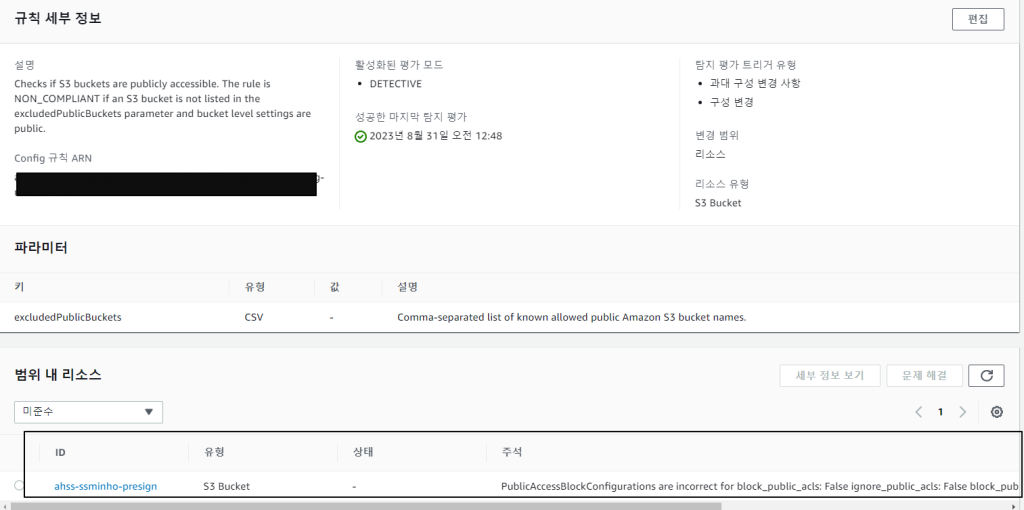
==Use AWS Config Rules to Detect a Public Bucket
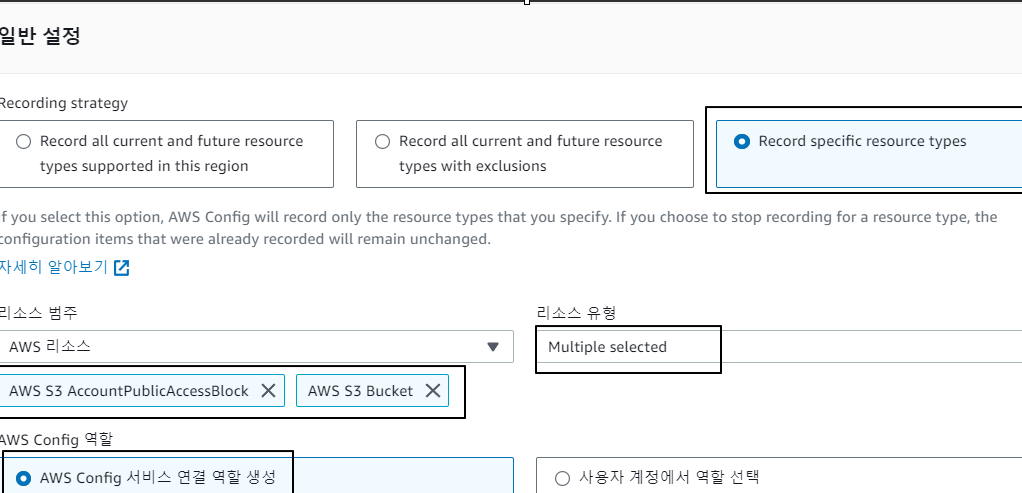
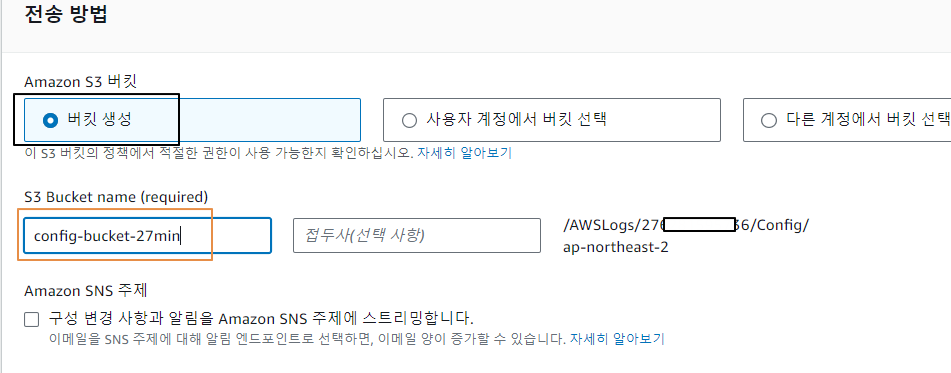
- [AWS 콘솔] config 서비스 → 시작하기 → 단계1~3 설정 : 결과 저장용 신규 버킷(유일 이름)을 생성합니다.
- 2~3분 정도 시간 후에 규정 점검 결과 확인
- (옵션) 규칙 상세 정보: https://github.com/awslabs/aws-config-rules/blob/master/aws-config-conformance-packs/Operational-Best-Practices-for-Amazon-S3.yaml
-실습 완료 후 자원삭제
- AWS Config → 생성된 규칙 삭제
- AWS IAM User (s3user) 삭제
- AWS 버킷 → 버킷 정책 삭제 → 비우기 → 삭제
- AWS CloudFormation 스택 삭제